Declarative OpenGL state management
The first version of OpenGL dates back to 1992. Even modern OpenGL projects still use a few functions originally specified nearly 30 years ago. The core concept of the API is the state machine that the programmer should readjust before each operation. Nowadays most APIs are designed based on the opposite concept - with years of experience, the stateless approach proved to be much easier to debug and maintain. In this article, we will look into the most basic settings related to drawing and try to simplify OpenGL state management. To achieve this, I will also explain different parts of the API and their respective permutations.
We will look at the depth, stencil, and scissor tests, as well as viewport, face culling, color masks, and dithering. These aren’t all of the possible states, just the most common ones.
If at any point you would like to see how such approach works in practice, check out WebFX. It’s a small rendering engine implemented in a browser using WebGL 2.0. It showcases quite a lot of modern techniques used to render virtual characters.
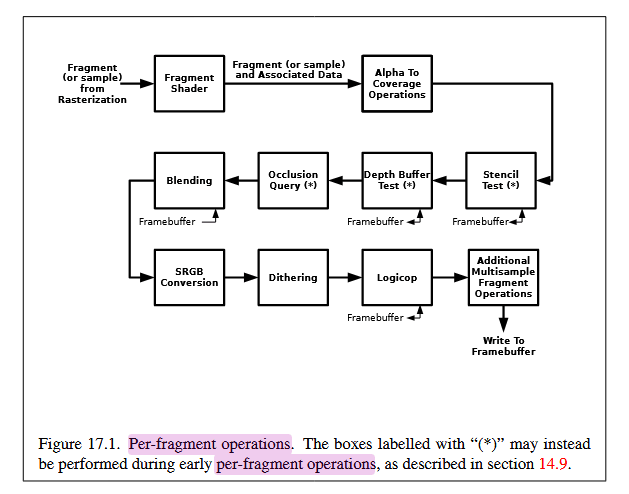
Possible OpenGL per-fragment operations. This is just a small part of the pipeline for graphic APIs. Most of the steps are in some way configurable, which proves how complex state management can be. Original graphic from OpenGL specification 4.6.
Depth testing
Depth testing is used to handle objects being in front of each other. We create a separate texture and for each pixel, we write how far it is from the camera (usually as float or unsigned int). When we render the subsequent object, the calculated depth of each pixel is compared with the previously written value. If it is lower, then the newly rendered pixel is closer to the camera. This is a binary test - pixel either passes or fails.
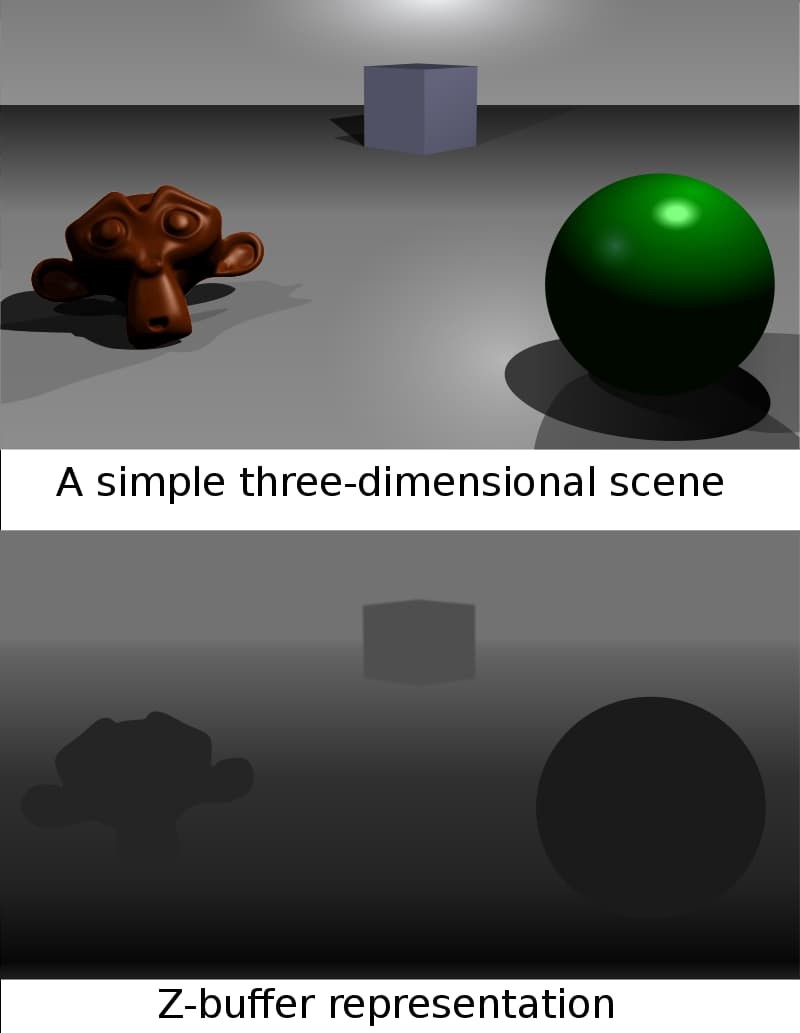
Example of depth buffer (values modified to make the change visible). Objects closer to the camera are darker. Created by user ‘-Zeus-’ for wikipedia. Available under CC BY-SA 3.0 license.
It’s common to sort all objects before rendering them in front-to-back order. This way all far objects will fail this test and their expensive pixel shader will not execute. This optimization technique is called early z depth test. In OpenGL you need to explicitly set layout(early_fragment_tests) in; in the fragment shader. By default fragment shaders can override pixel z position (gl_FragDepth), which prevents this optimization - hence the special command.
OpenGL specification 4.6 has a section “14.9 Early Per-Fragment Tests” that tried to specify this behavior, but (in my opinion) failed.
Additionally, floats have the highest precision near zero. Therefore further points suffer from limited precision. Games that need longer draw distances often reverse depth buffer. This way the values decrease along the distance from the camera and the high precision at longer distances prevents z-fighting. You can read more about OpenGL implementation in “Reverse Depth Buffer in OpenGL” by Daniele Carbone.
Enable/disable depth testing
There is a boolean flag to enable/disable depth testing: GL_DEPTH_TEST. To enable depth testing use glEnable(GL_DEPTH_TEST); and glDisable(GL_DEPTH_TEST); to turn it off.
Specifying depth function - glDepthFunc
I’ve already mentioned the comparison operator. On one side we have the depth of the currently processed pixel, on the other the value from a depth buffer. If the comparator is GL_LESS and the pixel’s depth is 0.1 vs depth buffer’s 0.2, the depth test will pass. These are the possible operators:
-
GL_NEVER- The depth test always fails. This actually can be used withglStencilOp, as we will soon see. -
GL_ALWAYS- The depth test always passes. Can be used to render game UI, but disabling depth testing is probably an easier solution. -
GL_EQUAL- Passes if values are the same. This is useful for z-prepass. In this optimization technique, we render the whole scene twice. First, with a no-op fragment shader, depth write on, and depth comparatorGL_LESS. This is the cheapest way to produce a depth map. Early in the frame graph, we can use this depth texture to calculate additional effects like Screen Space Ambient Occlusion(SSAO) or Screen Space Reflection (SSR). Later on, we rerender all meshes using same depth map andGL_EQUAL. This guarantees no fragment shader overdraw (which can be expensive). -
GL_NOTEQUAL- Passes if values are different. I don’t think I have ever used this value. -
GL_LESS/GL_LEQUAL- Passes if pixel’s depth value is less (GL_LESS) or less-or-equal(GL_LEQUAL). The most common value for not reversed depth buffer. -
GL_GREATER/GL_GEQUAL- Passes if pixel’s depth value is greater (GL_GREATER) or greater-or-equal(GL_GEQUAL). The most common value for reversed depth buffer.
Usage example: glDepthFunc(GL_ALWAYS);.
Enable depth write - glDepthMask
When rendering objects you can decide to not write to depth buffer using glDepthMask(false). Writing to depth buffer requires glDepthMask(true).
Miscellaneous depth state
Less common depth properties are e.g. glDepthRangef and depth clamping using glEnable(GL_DEPTH_CLAMP). They aren’t that complicated and most of the time you do not need to touch this.
Applying depth state
Here is an example structure containing the most useful depth state:
// The default values are VERY importantinterface Depth {test: GLenum = GL_LESS;write: boolean = true;}
Simple structure encapsulating depth state.
Here is code to apply it to the current OpenGL context:
function setOpenGlStateBool(state: Glenum, value: boolean) {if (value) {glEnable(state);} else {glDisable(state);}}function syncDepth(depth: Depth) {const enableDepthTest = depth.test !== GL_ALWAYS || depth.write;setOpenGlStateBool(GL_DEPTH_TEST, enableDepthTest);gl.depthFunc(depth.test);gl.depthMask(depth.write);}
Synchronize depth state using the structure presented above.
Stencil
Stencil is another binary mask, but this time we control the values. This usually involves 2 separate draw calls. As an example, we can take a look at Screen Space Subsurface Scattering (SSSSS). It’s a post-processing effect that is used to make skin look mellow. First, we render (potentially many) head models and mark in a stencil buffer/texture all the pixels that changed the value. Then we do a 2nd pass with a fullscreen quad, but we restrict it to only consider pixels that we touched in the previous pass. Since 2nd pass of SSSSS can be quite expensive (basically a blur with an additional wavelength-based profile), it’s a nice optimization technique.
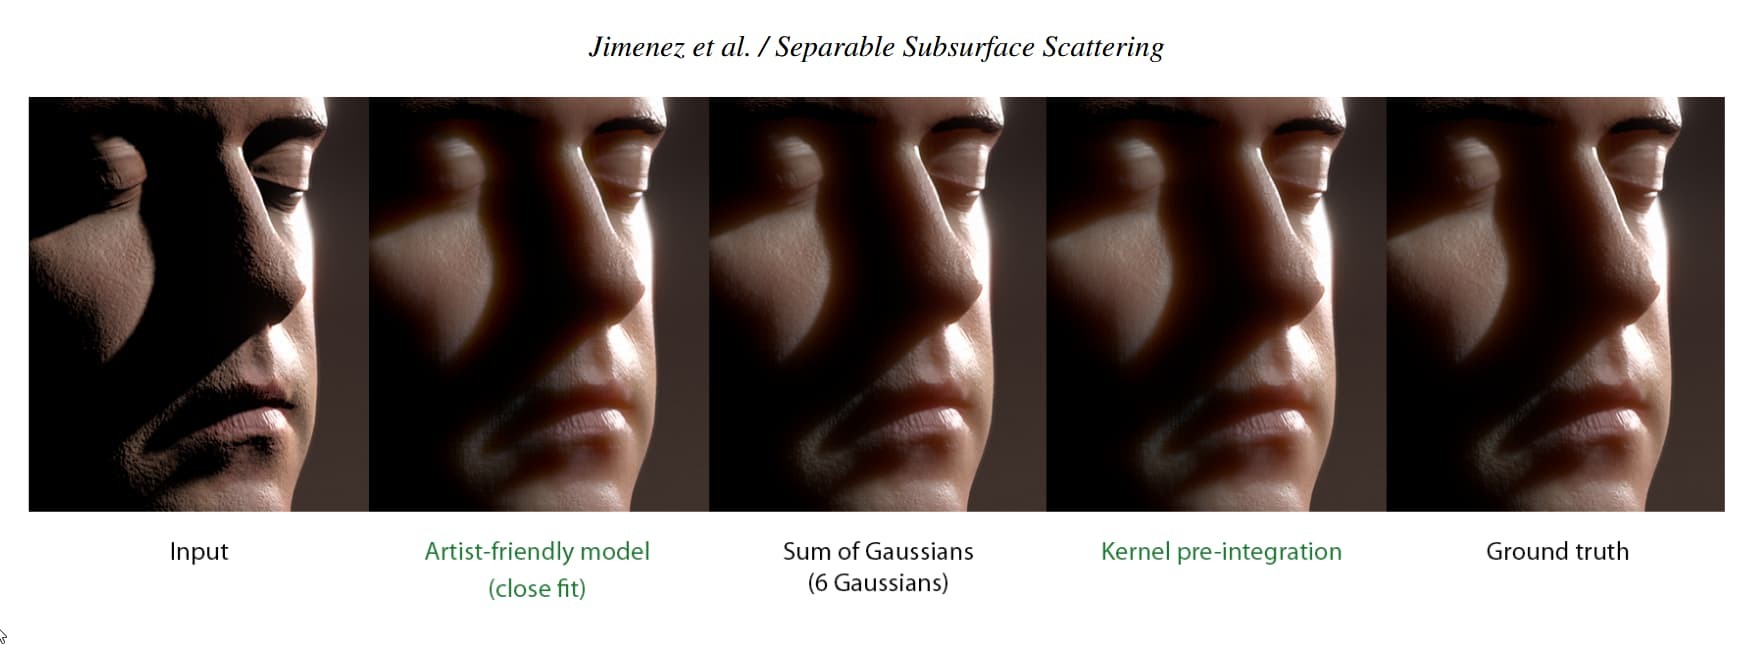
Screen Space Subsurface Scattering (SSSSS) in action. This is a screen from the original paper: Separable Subsurface Scattering – Computer Graphics Forum 2015 (presented at EGSR 2015) – J. Jimenez, K. Zsolnai, A. Jarabo, C. Freude, T. Auzinger, X-C. Wu, J. von der Pahlen, M. Wimmer and D. Gutierrez.
Károly Zsolnai of “Two Minute Papers” YouTube channel fame is one of the coauthors of the “Separable Subsurface Scattering” paper. Indeed, Two Minute Papers #66 and this special episode are dedicated to SSSSS.
const SKIN_STENCIL_REF = 0b00000001;// Pass 1 - render all meshes using skin shaderglUseProgram(skinShader);// ...uniforms, textures, render targets etc.glDisable(GL_STENCIL_TEST); // this pass does not need stencil test, but it will write to stencil bufferglStencilMask(0b11111111); // enable writing for ALL bitsglStencilOp(GL_ZERO, GL_ZERO, GL_REPLACE); // write `ref` to stencil bufferglStencilFunc(GL_ALWAYS, // always passSKIN_STENCIL_REF, // `ref`, will be written to stencil buffer when used with `GL_REPLACE`0b11111111 // `bit mask` for `ref`);drawHumanSkinObjects();// Pass 2 - SSSSS blur (sometimes split into separate horizontal and veritcal blur passes)glUseProgram(sssssBlurShader);// ...uniforms, textures, render targets etc.// Requires that render target has same stencil buffer as the first pass!glEnable(GL_STENCIL_TEST);glStencilMask(0); // disable writingglStencilFunc(GL_EQUAL, // passes only when `ref` and stencil buffer value are the sameSKIN_STENCIL_REF, // `ref` to compare to stencil buffer value. Values have to be be equal ( based on `GL_EQUAL`)0b11111111 // `bit mask` for `ref`);drawFullscreenQuad();
Rendering SSSSS using 2 passes. The first pass renders all meshes and has a complicated pixel shader. It also sets the stencil buffer to SKIN_STENCIL_REF for each rendered pixel. Later we draw a fullscreen pass and compare stencil buffer value with SKIN_STENCIL_REF using GL_EQUAL comparator.
A stencil buffer usually offers 8-bit resolution (256 values). It’s common to use a mask, so you compare e.g. only the 5th bit. The stencil buffer is great to mark pixels that contain certain properties e.g. skin, wet surfaces, etc. It can also be used with basic math operations with e.g. GL_INCR.
Stencil settings are separable. This means we can specify the settings for front and back faces independently. I will explore this topic in detail in sections about face culling. Separable stencil functions have Separate suffix (e.g. glStencilMaskSeparate) and the first parameter is always GLenum face which can be one of GL_FRONT, GL_BACK, GL_FRONT_AND_BACK. The nonseparable variant is equal to GL_FRONT_AND_BACK.
Enable/disable stencil testing
There is a boolean flag to enable/disable stencil testing: GL_STENCIL_TEST. To enable stencil testing use glEnable(GL_STENCIL_TEST); and glDisable(GL_STENCIL_TEST); to disable it. The flag should be set to true only for the 2nd pass (the one with sssssBlurShader), and not the first one (with skinShader).
Specifying stencil write mask - glStencilMask
When writing to the stencil buffer, we can allow modifying only selected bits using glStencilMask(GLuint mask). This mask applies only to write operations. It can be set for front/back faces individually using glStencilMaskSeparate(GLenum face, GLuint mask).
Example: glStencilMask(0b00111100) will allow to change only 2nd, 3rd, 4th, 5th bit of stencil buffer. glStencilMask(0xff); allows to change all bits. glStencilMask(0x0); disables stencil buffer write.
Depth write mask was set using glDepthMask(GLboolean). Stencil uses
glStencilMask(GLuint mask). The naming is quite similar and will be easier to remember this way.
Stencil comparison - glStencilFunc
The stencil test is based on a comparison of the current stencil buffer value and some reference value (known as ref). You specify ref from the client code (C, C++, JavaScript, etc.). This behavior is regulated by glStencilFunc(GLenum func, GLint ref, GLuint mask.
The first argument - GLenum func - is the comparison operator and can take the following values:
-
GL_ALWAYS- Pixel will always pass the stencil test. -
GL_NEVER- Pixel will always fail the stencil test. Can be used to set/reset the value of stencil buffer bits when combined withglStencilOp’sGLenum sfailargument. -
GL_LESS- Pixel passes ifref<current_stencil_value. My alias:IfRefIsLessThanCurrent. -
GL_LEQUAL- Pixel passes ifref≤current_stencil_value. My alias:IfRefIsLessOrEqualCurrent. -
GL_GREATER- Pixel passes ifref>current_stencil_value. My alias:IfRefIsMoreThanCurrent. -
GL_GEQUAL- Pixel passes ifref≥current_stencil_value. My alias:IfRefIsMoreOrEqualCurrent. -
GL_EQUAL- Pixel passes ifref==current_stencil_value. My alias:IfRefIsEqualCurrent. -
GL_NOTEQUAL- Pixel passes ifref!=current_stencil_value. My alias:IfRefIsNotEqualCurrent.
Of these, GL_EQUAL is probably the most useful. Both ref and current_stencil_value is modified by glStencilFunc’s 3rd argument - GLuint mask. So GL_LESS becomes (ref & mask) < (current_stencil_value & mask).
The second argument is GLint ref, which is a reference value. It will be compared to the current value in stencil buffer using above mentioned GLenum func. Later, glStencilOp will also use this value to decide what to write to the stencil buffer.
All these parameters can be set for front/back faces individually using glStencilFuncSeparate(GLenum face, GLenum func, GLint ref, GLuint mask).
Example: glStencilFunc(GL_GEQUAL, 0b00001100, 0b00000111) will use reference value 0b00001100 & 0b00000111 = 0b00000100 and compare it with current_stencil_value_for_this_pixel & 0b00000111. The test will pass if the reference value is greater or equal.
In the depth test we had glDepthFunc(GLenum) to control the comparison operator.
glStencilFunchas a similar naming convention, which makes it easier to remember.
Stencil write action - glStencilOp
The last part of the stencil state is related to written value. With glStencilOp(GLenum sfail, GLenum dpfail, GLenum dppass); we decide what action to take depending on stencil and depth test results. Each argument corresponds to the following stage:
-
sfail- Operation to execute when the stencil test fails. -
dpfail- Operation to execute when the stencil test passes, but the depth test fails. As you might have noticed, the stencil test is always executed first. -
dppass- Operation to execute when either:- both stencil test and the depth test pass,
- stencil test passes and there is no depth buffer or depth testing is not enabled
Each argument can take one of the following values, describing the action to take:
-
GL_KEEP- Keep current value (basically a no-op). -
GL_ZERO- Set stencil buffer value to 0. -
GL_REPLACE- Write reference value (GLint reffromglStencilFuncthat we discussed above). -
GL_INCR- Value is clamped toMAX_INT:current_stencil_value == MAX_INT ? MAX_INT : current_stencil_value+ 1. -
GL_INCR_WRAP- Value wraps to 0 during int overflow. Uses following algorithm:current_stencil_value == MAX_INT ? 0 : current_stencil_value + 1 -
GL_DECR- Value is clamped to 0:current_stencil_value == 0 ? 0 : current_stencil_value - 1. -
GL_DECR_WRAP- Value wraps toMAX_INTduring int overflow. Uses following algorithm:current_stencil_value == 0 ? MAX_INT : current_stencil_value - 1 -
GL_INVERT- Invert bits of current value.
where MAX_INT depends on stencil bits: .
Please remember about the write mask that we specified using glStencilMask! Mathematical operations based on current value (GL_INCR, GL_INCR_WRAP, GL_DECR, GL_DECR_WRAP) usually make the most sense if we allow writing to all bits.
The power of glStencilOp lies in specifying different operations for each stage. Also, nothing stops you from writing to stencil buffer during the draw call that itself discards pixels using stencil test. This use case can be even further regulated by glStencilOp’s GLenum sfail argument.
All these parameters can be set for front/back faces individually using glStencilOpSeparate(GLenum face, GLenum sfail, GLenum dpfail, GLenum dppass).
Example: glStencilOp(GL_ZERO, GL_ZERO, GL_REPLACE) from the SSSSS example above will write ref & stencil_write_mask if both stencil and depth tests pass. If either of the tests fails, the not-masked bits will be reset to 0.
Applying stencil state
Here is an example structure containing the most useful Stencil state:
// My aliases, since OpenGL naming is (for me) EXTREMLY unclear.enum StencilTest {AlwaysPass = GL_ALWAYS,AlwaysFail = GL_NEVER,IfRefIsLessThanCurrent = GL_LESS,IfRefIsLessOrEqualCurrent = GL_LEQUAL,IfRefIsMoreThanCurrent = GL_GREATER,IfRefIsMoreOrEqualCurrent = GL_GEQUAL,IfRefIsEqualCurrent = GL_EQUAL,IfRefIsNotEqualCurrent = GL_NOTEQUAL,}// The default values are VERY importantinterface StencilPerSide {/** Comparison against the existing value in the stencil buffer. */test: StencilTest = StencilTest.AlwaysPass;/** Specifies the operation to do when a fragment fails the stencil test. */opStencilFail = GL_KEEP;/** Specifies the operation to do when a fragment passes the stencil test but fails the depth test.*/opStencilPassDepthFail = GL_KEEP;/** Specifies the operation to do when a fragment passes both the stencil and depth tests. */opPass = GL_KEEP;/*** Reference value, can be used to:* * compare to it in stencil test* * write to stencil buffer GL_REPLACE*/referenceValue: GLint = 0;/** used for compare, see last arg to glStencilFunc. Also known as ReadMask */compareMask: GLuint = 0xffffffff;/** Allows specifying a mask when writing data on the stencil buffer. Also known as WriteMask */writeBytes: GLuint = 0xffffffff;}interface Stencil {front: StencilPerSide;back: StencilPerSide;}
Not so simple structure encapsulating stencil state.
Use the following code to apply it to the current OpenGL context:
function setOpenGlStateBool(state: Glenum, value: boolean) {if (value) {glEnable(state);} else {glDisable(state);}}function isStencilNoop(settings: StencilPerSide){const all_noop = settings.opStencilFail == StencilOperation.Keep&& settings.opStencilPassDepthFail == StencilOperation.Keep&& settings.opPass == StencilOperation.Keep;return all_noop && settings.test == StencilTest.AlwaysPass;}function syncStencilSide(side: Glenum, side: StencilPerSide) {glStencilFuncSeparate(side, side.test, side.referenceValue, side.compareMask);glStencilMaskSeparate(side, side.writeBytes);glStencilOpSeparate(side,side.opStencilFail,side.opStencilPassDepthFail,side.opPass);}function syncStencil(stencil: Stencil) {const skipStencilTest = isStencilNoop(stencil.front) && isStencilNoop(stencil.back);setStateBool(GL_STENCIL_TEST, !skipStencilTest);syncStencilSide(GL_FRONT, stencil.front);syncStencilSide(GL_BACK, stencil.back);};
Synchronize stencil state.
Other common OpenGL draw states
In this section, I will go over some other useful OpenGL settings that influence draw calls.
Scissor - glScissor
After depth and stencil tests, the scissor is refreshingly simple. It allows to discard samples that do not fit inside a specified rectangle. glScissor(GLint x, GLint y, GLsizei width, GLsizei height); takes values in pixels. Use glEnable(GL_SCISSOR_TEST); to enable this test, and glDisable(GL_SCISSOR_TEST); to turn it off. It’s a quick and simple optimization to discard certain pixels - sometimes even before fragment shader!
Example: glEnable(GL_SCISSOR_TEST); glScissor(100, 100, 200, 200); will allow changes only to a small square between (100, 100) and (200, 200).
Viewport - glViewport
To specify the position and dimensions of the draw surface use glViewport(GLint x, GLint y, GLsizei width, GLsizei height);. This is a VERY important setting! It even allows you to easily implement supersampling by rendering the scene to textures bigger than the final image (expensive!).
Technically,
glViewportspecifies transformation between device coordinates to window coordinates.
Since OpenGL 4.1 many viewports can be used at the same time. This is done using glViewportIndexed or glViewportArray. A popular effect that requires this functionality is chroma subsampling. Since the human eye is more sensitive to changes in luminance than in color, the luma channel is rendered into full resolution texture. Color/chroma is rendered into a half-resolution buffer instead (in the same pass).
Example: Render image to fill the screen: glViewport(0, 0, screen_width, screen_height);. In WebFX I’ve used glViewport to render debug screens in bottom right corner. glViewport(screen_width * 0.66, screen_height * 0.66, screen_width * 0.33, screen_height * 0.33);.
If you are wondering about differences between the scissor test and glViewport I recommend reading What is the purpose of glScissor?.
Cull state
In 3D, each triangle has 2 sides. One will be facing toward the camera, the other in the opposite direction. Due to floating point (in)accuracy and perspective distortion, we will rarely have to deal with triangles perpendicular to the camera. If the 3D model does not have holes, we can safely render only the triangles that are facing towards the camera. This can potentially save us 50% of the work! Using winding order, we can decide which way the triangle is facing without calculating the normals. After vertex shader processes the vertices, we check if triangle indices create clockwise (CW) or counter-clockwise (CCW) pattern. Each 3D software uses its own convention e.g. Unity is CW, while Blender exports CCW.
To enable backface culling use glEnable(GL_CULL_FACE), or glDisable(GL_CULL_FACE) if you want to disable it. You can switch what OpenGL interprets as a front face using glFrontFace(GLenum mode) - one of GL_CW or GL_CCW, but it’s quite rare to change it. Then, for each draw call you can select to cull front/back facing triangles using glCullFace(GLenum mode) - either GL_FRONT or GL_BACK. While normally only front face is rendered, rendering back faces is used in certain techniques. I’ve seen it done in a few implementations of deferred shading.
Example:
-
glDisable(GL_CULL_FACE)- Both sides will be drawn -
glEnable(GL_CULL_FACE); glCullFace(GL_BACK)- Only front side will be drawn -
glEnable(GL_CULL_FACE); glCullFace(GL_FRONT)- Only back side will be drawn
Per-channel write - glColorMask
Use glColorMask(GLboolean red, GLboolean green, GLboolean blue, GLboolean alpha); to decide if the color channel will be changed. Value true allows writes, while false will skip the color channel. It may be quite surprising that glColorMask(false, false, false, false) is sometimes used. e.g. we might only care about depth or stencil modification. Or pixel shader has side-effect. This is commonly used in combination with shader-writable structures like Shader Storage Buffer Object (SSBO) used to implement e.g. order-independent transparency.
Dithering
Our monitors can only represent a limited number of values per channel. You are probably familiar with each channel represented as 8 bits (value range 0-255). In shaders, we usually do mathematical operations based on floats. Both 126.1 and 126.9 will be shown as value 126, even though the difference in numbers is quite big. If this happens over large surfaces, the results will be a jarring border between 2 areas.
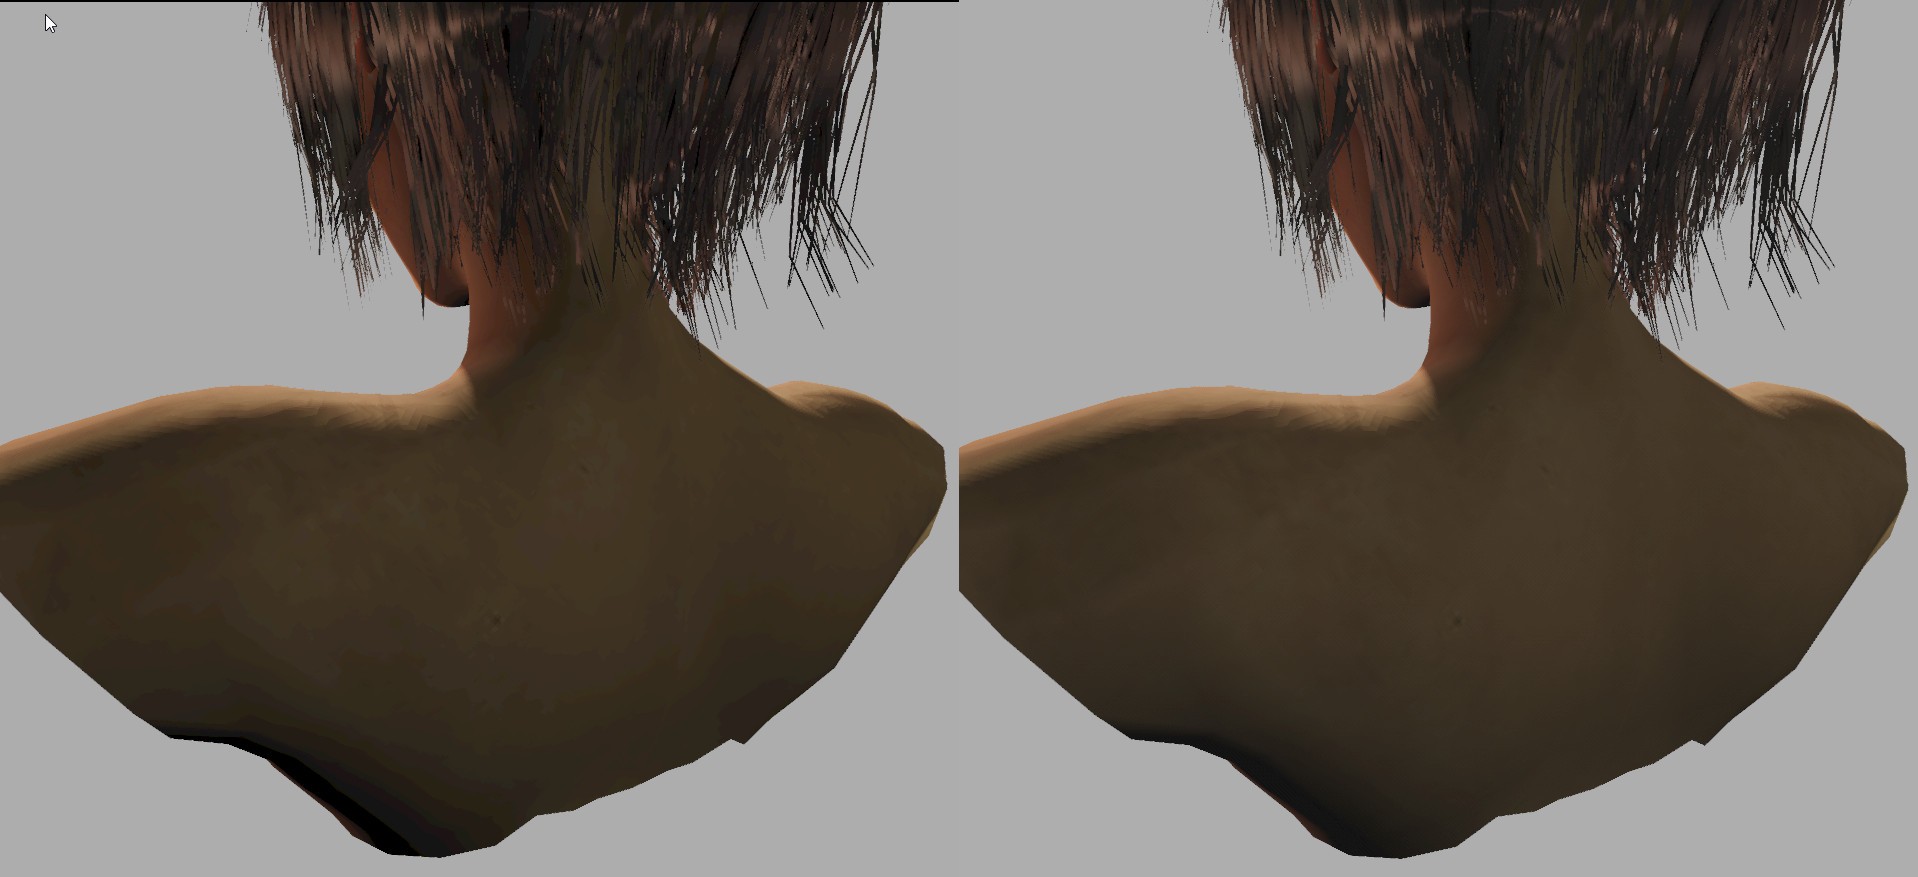
Sintel’s back is a huge smooth surface, the type that is prone to dithering artifacts. Just look at the areas in the shadows! In the demo you can test it yourself using the Post FX -> Dither slider.
The solution is simple - add small (much less than 1), unique random value to each pixel. This guarantees that only a few pixels next to each other will have the same color. This smoothens out the color transitions. This algorithm uses Bayer matrix and can be easily implemented by hand. Or we can use glEnable(GL_DITHER).
Blend
Unfortunately, I do not have enough experience to discuss blend states. This topic is quite complicated and would probably require a separate article. I can recommend Apoorva Joshi’s “Alpha compositing, OpenGL blending and premultiplied alpha” as a good overview.
Managing OpenGL draw state
We have seen how to manipulate the following OpenGL draw parameters:
- depth test
- stencil test
- scissor test
- cull state
- dithering
- color channel mask
- viewports
Now we are going to combine this knowledge into a single, easy-to-use abstraction. But first, let’s look at the last optimization.
State diffing
Changing and querying OpenGL state can be expensive. We can save a bit of work by manually comparing the current state with the previous one. If they are the same, we can shave a few OpenGL calls. Just store the copy for future comparison after each change. All structures shown in this article are a simple Plain Old Data (POD). Often, the compilator will generate a comparator for us. This, compared with sensible defaults, makes it easy to manage the OpenGL state.
Just in case I would also add a flag to force the state update regardless of the changes. Useful if we want to get back to the known state after handing execution to 3rd party library like imgui (which already cleans up after itself).
Final code
For full code in one of my projects see WebFX’s applyDrawParams.
interface DrawParams {depth: Depth;stencilFront: StencilPerSide;stencilBack: StencilPerSide;dithering: boolean = false;culling: 'render_front' | 'render_back' | 'render_both' = 'render_both';colorWrite: [boolean, boolean, boolean, boolean] = [true, true, true, true];viewport: [int32, int32, int32, int32];}function setOpenGlStateBool(state: Glenum, value: boolean) {if (value) {glEnable(state);} else {glDisable(state);}}function syncDrawParams(currentState: DrawParams,nextState: DrawParams,forceUpdate = false,){const stateChanged = !isEqualState(currentState, nextState); // implementation left for a readerif (!stateChanged && !forceUpdate) {// If you want, you can have more granular comparison for each of the featuresreturn;}syncDepth(nextState.depth);syncStencilSide(GL_FRONT, nextState.stencilFront);syncStencilSide(GL_BACK, nextState.stencilBack);setOpenGlStateBool(GL_DITHER, nextState.dithering);const mask = nextState.colorWrite;glColorMask(mask[0], mask[1], mask[2], mask[3]);const vp = nextState.viewport;glViewport(vp[0], vp[1], vp[2], vp[3]);if (nextState.culling == 'render_both') {setOpenGlStateBool(GL_CULL_FACE, false);} else {setOpenGlStateBool(GL_CULL_FACE, true);glCullFace(nextState.culling == 'render_back' ? GL_FRONT : GL_BACK);}}
Synchronize OpenGL draw state.
Clearing buffers
Call glClear(GLbitfield mask) to clear depth/stencil/color textures of currently bound framebuffer object (FBO): glClear(GL_COLOR_BUFFER_BIT | GL_DEPTH_BUFFER_BIT | GL_STENCIL_BUFFER_BIT). Writen values can be adjusted using following functions:
-
Depth: glClearDepthf(GLfloat depth) changes the written value for depth buffer (
1.0by default). UseglDepthMask(true);to allow writing to depth buffer. -
Stencil: glClearStencil(GLint s will set value to be written. It is affected by the number of bits in the stencil buffer and current mask. Use e.g.
glStencilMask(0xff);to allow writes. -
Color: glClearColor(GLfloat red, GLfloat green, GLfloat blue, GLfloat alpha) sets the value to write. It will be writen to color attachements specified in glDrawBuffer or glDrawBuffers. Affected by glColorMask.
From the docs, here is what affects this operation:
-
Pixel ownership test - there are special rules for the default/window framebuffer. See OpenGL 4.6 spec section “14.9.1 Pixel Ownership Test”.
-
The scissor test - discussed in scissor test section. Used to clear only a rectangular subsection of the texture.
-
Dithering - discussed in dithering section
-
Buffer writemasks - each type of buffer is affected by different masks as discussed in a previous paragraph.
In particular, glClear is not affected by blend function, stencil, fragment shaders, depth-buffering, or glViewport.
Worth mentioning that glClear is quite old, and glClearBuffer can be used as an alternative. The named variants are not limited to the currently bound framebuffer.
glDisable(GL_SCISSOR_TEST);glDisable(GL_DITHER);// depth settingsglDepthMask(true); // allow writeglClearDepthf(0.625); // not sure why you would clear depth to 0.625, but you do you. Usually it's 0 or 1 here.// stencil settingsglStencilMask(0xff); // allow writeglClearStencil(0); // reset to 0// color settingsglColorMask(true, true, true, true); // allow writeglClearColor(1.0, 0.0, 0.0, 0.5); // clear to half-transparent redGLenum clearedColorBuffers[3] = {GL_COLOR_ATTACHMENT0, GL_COLOR_ATTACHMENT1, GL_COLOR_ATTACHMENT2};glDrawBuffers(3, clearedColorBuffers); // select color attachments to clear, alternatively:// glDrawBuffer(GL_FRONT_LEFT); // single-buffered default monoscopic FBO// glDrawBuffer(GL_BACK_LEFT); // double-buffered default monoscopic FBO (back buffer)// execute clearglClear(GL_COLOR_BUFFER_BIT | GL_DEPTH_BUFFER_BIT | GL_STENCIL_BUFFER_BIT);// alternatives using glClearBufferfloat clearColor[4] = {1.0f, 0.0f, 0.0f, 0.5f};glClearBufferfv(GL_COLOR, GL_DRAW_BUFFER0, clearColor); // colorfloat clearDepth[1] = {0.5f};glClearBufferfv(GL_DEPTH, 0, clearDepth); // depthint clearStencil[1] = {0};glClearBufferiv(GL_STENCIL, 0, clearStencil); // stencil
Ways to clear depth/stencil/color buffers
Instead of using
glClear, you can also set values from shaders (depth and color) or with proper client-side options (stencil). This separate pass can also be affected by depth, stencil tests, etc., which gives you much more control. In my experience this is rarely needed.glClearcan be e.g. optimized by hardware using dirty flags, load/store transitions, etc.
Summary
Our goal was to simplify draw state management in OpenGL. State management is a crucial part of the API, but lack of visibility and inaccessible documentation made it complicated to use. After applying a few tricks we were able to achieve:
-
State management using a single
syncDrawParams. Much easier to remember than tens of separate function signatures. -
Functional semantic that allows us to write what we want to achieve, and apply it as a single unit. This completely removes the stateful approach that requires the programmer to track the state between draw calls.
-
Sensible defaults that are easy to remember. My defaults are whatever values are used to draw a simple cube on the screen. Depth test as
GL_LESS, no stencil test, no dithering or culling, all color channels write, etc. -
Better accessibility. Personally,
glDepthMaskdoes not scream to me ‘allow write to depth buffer’. AndIfRefIsLessOrEqualCurrentis a mouthful, but IMO better than a singleGL_LEQUAL. Filling out theDrawParamsstructure also offers better discoverability and autocomplete.
If you are interested in a whole project using such an API wrapper, check out WebFX. It’s a small rendering engine implemented in a browser using WebGL 2.0. It showcases quite a lot of modern techniques used to render virtual characters.