Using Unity's strand-based hair package
In this article, we will create hair in Unity using com.unity.demoteam.hair package. As a lot of people noticed, the official documentation is.. lacking. There was a SIGGRAPH 2022 presentation “Probe-based lighting, strand-based hair system, and physical hair shading in Unity’s ‘Enemies’”, but it’s mostly a list of used technology. Even the unlisted(!) video “Inside Unity’s new flagship demo, Enemies | Unity at GDC 2022” from the official Unity YouTube channel just walks through the sample scene. None of this helps the artist in actually creating new hair for their character. Let’s remedy that.
There also exists cn.unity.hairfx.core. It’s a simple port of TressFX. As we will see,
com.unity.demoteam.hairis only loosely inspired by AMD’s work.

The final result. FUN!
We will start with a hair system in Blender, and export it into Alembic curves. The file gets imported into Unity, where we add materials and tweak physics settings. We then add collisions using both capsules and signed distance fields (SDF). Both the Blender file and the Unity project are available in my “unity-hair” GitHub repository. Check it out to find hair samples and stage-by-stage visualizations. All images in this article were derived from it. It’s quite fun to play with the physics! Just look at the videos in the Readme!
I do not work for Unity. I do not even work in this tech sector. I’ve tried integrating hair into “AI-Iris-Avatar” and I gave up. I do have previous experience with TressFX.
Creating hair in Blender
First, I recommend growing the hair on a simple plane. Later on, you would want to isolate the haircap mesh and style the hair. Often, many hair systems are combined to create a single hairstyle. Separate one for fringe, bangs, scalp, nape, ponytail, bun, etc. Once you understand the main process it will be easier to adjust.
You might notice I’m using Blender’s old, deprecated hair system. A year ago, in Blender 3.5, the procedural/curve-based system became the default. But some people reading this article might have never used Blender before. The old system, while less powerful, is a bit easier to grasp.
- Create a plane:
Shift + a->Mesh->Plane. - In “Properties” switch to the “Particles” tab. Add a new Particle system with the type “Hair”.
- Change strand number and hair length.
- If the hair looks “blocky”, increase “Viewport display” -> “Strand Steps”. Also, in scene render settings, set “Curves” -> “Shape” to “Strip” with 3 subdivisions.
- You can add children to spawn more strands based on the current ones. If your system has 100 strands, and the children’s “Render Amount” is 100, you will export 10000 hair strands in total.
- In viewport, switch to “Particle Edit” mode.
- Use the tools to comb the hair.
- (Optional) UV unwrap the mesh.
- Switch to “Edit mode”.
- Press
uand select unwrap.
Be watchful of where the object’s origin is. The hair is usually ~1.80m from the ground, but it’s better if the origin is around the center of the mesh. It makes it easier to add “Parent Constraint” in Unity later.
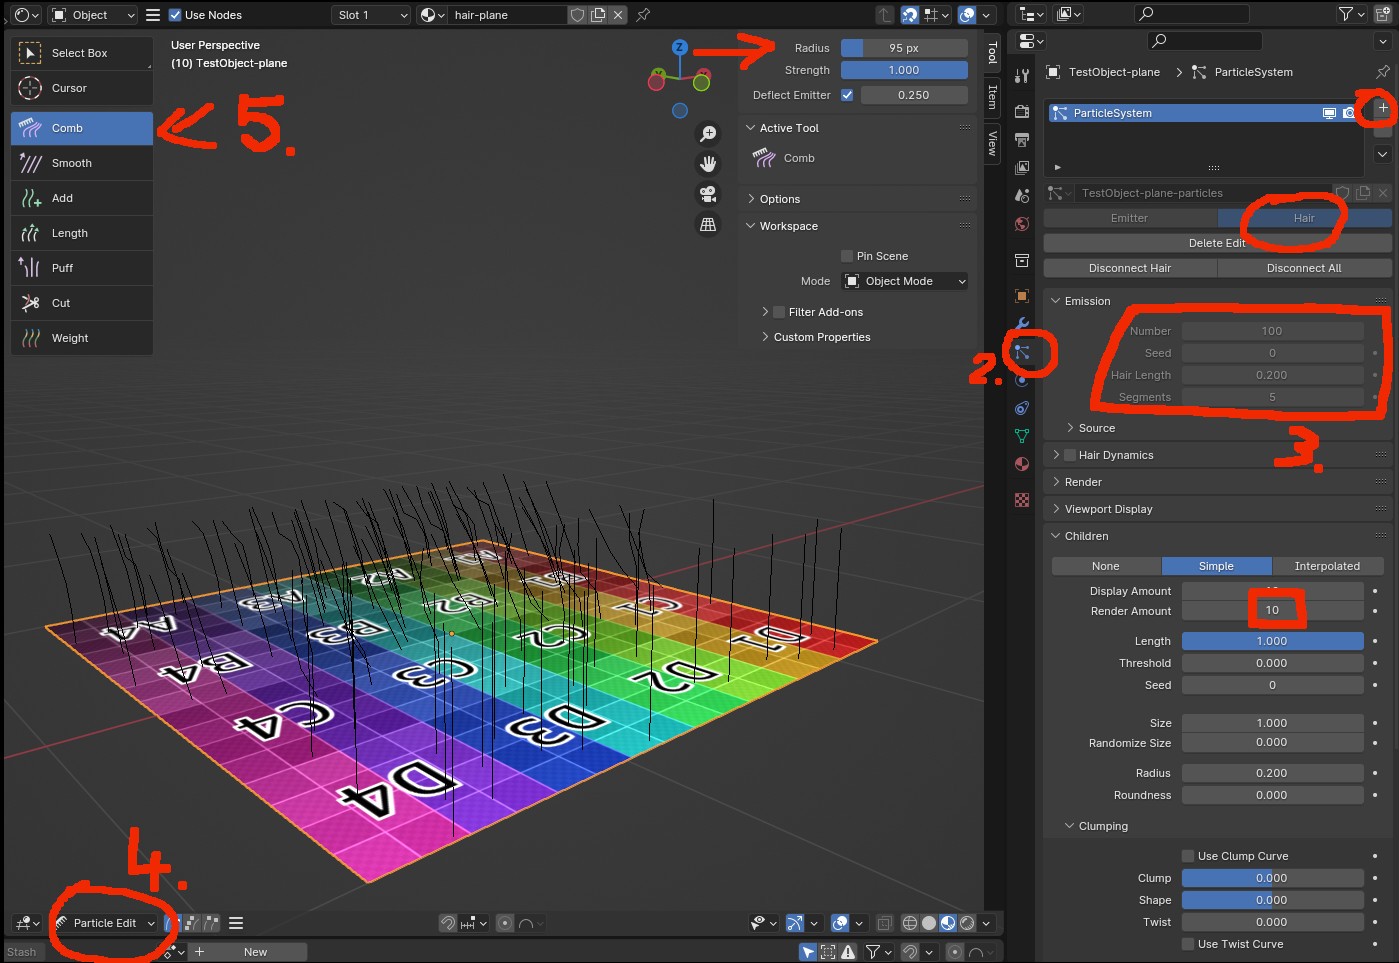
Editing hair in Blender using the older, particle-based system. Numbers correspond to the steps from the instructions above.
If you are using the new Blender hair system (based on curves) there are a few extra steps before the export. First, apply the curve object’s modifiers. This is a curve-specific set of modifiers, separate from the base mesh. The new hair solution aims at non-destructive editing. The curly hair is achieved by applying a curl node/modifier to a straight hair strand. Skipping this step would export the unmodified strand. You might want to backup the curve object before squashing the modifier stack. Then, convert the curve object into a particle system: “Object” -> “Convert To” -> “Particle System”. This operation is non-destructive - it copies the data. Hide the original curve object to preview the particle-based hair. There is a video tutorial on YouTube that I have used as a guide: “Alembic Hair from Blender to Unity Tutorial [ Pt 1 ]” by Ciorbyn Studio. As a test, I’ve imported Blender’s official sample file into Blender 4.0 and exported it into Unity. It worked out fine.
Once the hairstyle is complete, we can export it to Unity.
- Select the object with the hair system.
- “File” -> “Export” -> “Alembic (.abc)“.
- In export settings, check “Only selected objects”.
- Make sure “Frame Start” and End are different numbers (it’s a common crash cause in Unity). If they are the default 1 and 250 it’s perfect. It may work, but better safe than sorry. The actual numbers here do not matter, they just crash the Unity editor if something is wrong.
- Export to the file inside the unity project’s “Assets” directory.
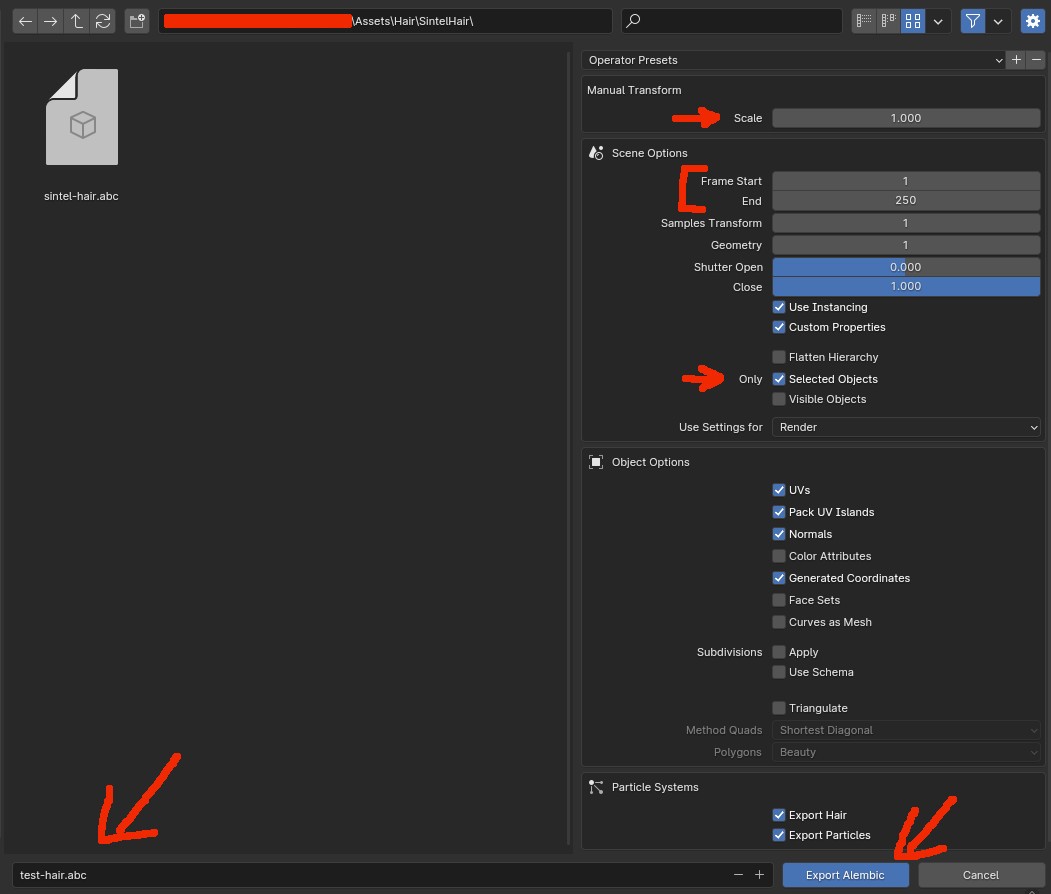
Blender export settings for Alembic file that contains hair’s curves.
Make sure your object does not have any modifiers other than the particle system. Especially mirror or subdivision. Apply them before exporting. Check the “.abc” file size. If it’s < 20kb something probably went wrong. Google “Alembic file viewer online” and try your file there. The base mesh should be visible (but no hair). It’s a quick sanity check.
You do not need to rig the human hair. We will parent it to Unity mecanim’s “Head” bone. I’m not sure how this would work if you needed skinning. That’s a problem for characters with a beard, as the jaw moves independently from the sideburns. You could have a separate “Jaw” bone animated during lip sync. One hair system is parented to it, while the sideburns follow the “Head” bone. As the natural jaw movement is limited and hair is transparent, this layering could work. You can also check com.unity.demoteam.digital-human for a better solution. It allows the hair to be influenced by underlying geometry.
Importing hair into Unity
Required Unity extensions
We will need the following Unity extensions:
com.unity.demoteam.hair- Installed using git link:
https://github.com/Unity-Technologies/com.unity.demoteam.hair.git. - Documentation: https://learn.unity.com/project/getting-started-with-hair-simulation.
- Git repo: https://github.com/Unity-Technologies/com.unity.demoteam.hair.
- Installed using git link:
com.unity.formats.alembic- Present in Unity Registry by default. You just need to activate it.
com.unity.demoteam.mesh-to-sdf(only needed for SDF collisions)- Installed using git link:
https://github.com/Unity-Technologies/com.unity.demoteam.mesh-to-sdf.git. - Documentation: https://github.com/Unity-Technologies/com.unity.demoteam.mesh-to-sdf/blob/main/Documentation~/index.md.
- Git repo: https://github.com/Unity-Technologies/com.unity.demoteam.mesh-to-sdf.
- Installed using git link:
Install them all using Unity’s Package Manager (“Window” -> “Package Manager”).
Unity may crash during the installation of the Alembic extension. It means that it was installed correctly, but it tried to read an invalid “.abc” file. This extension has no error handling whatsoever. If the file is incorrect, the whole editor will crash.
Creating hair asset
If the Alembic file is OK, Unity will automatically read it (the whole editor will crash otherwise!). Select it in the “Project” window to bring out “Inspector” settings. Make sure “Import Curves” is ON, while “Add Curve Renderers” is OFF (see picture). The “Scale Factor” should be the reverse of what you provided during the Blender export. At the bottom of the inspector is the preview. It will only show the mesh and not the hair. This is OK.
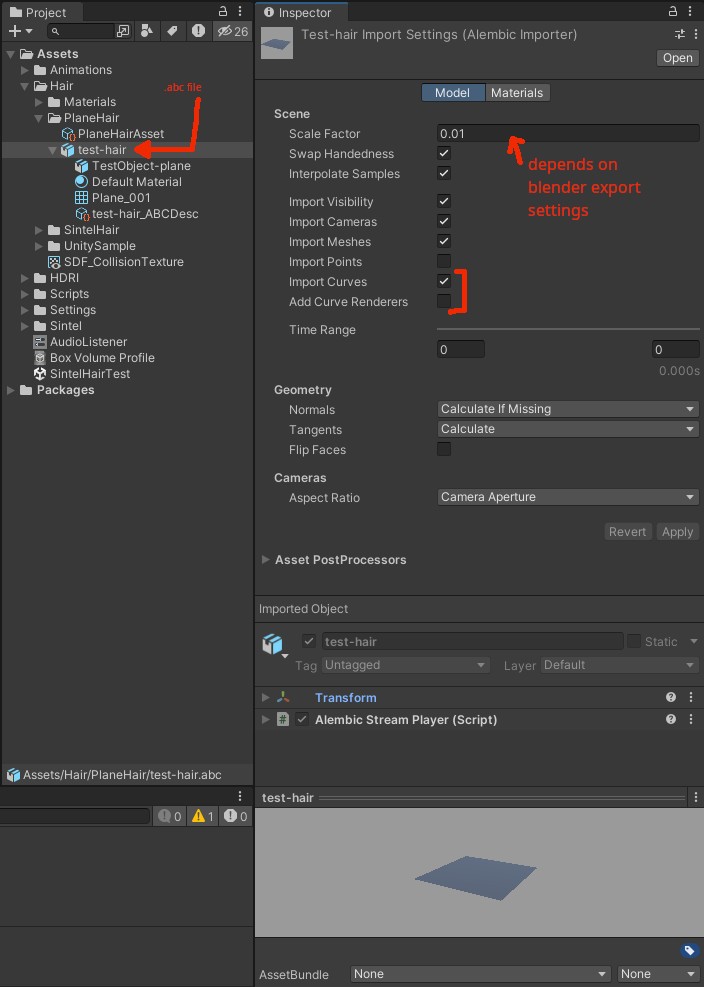
Alembic file import settings inside Unity.
Go back to the “Project” window and: Right click anywhere -> “Create” -> “Hair”. In “Type” select “Alembic”. There should be a new UI group below called “Settings Alembic”. In “Alembic Asset” select the “.abc” file (may take a minute to show up). Scroll down to find the “Build strand groups” button, which will make the preview appear. If the asset was exported incorrectly, you will get a warning like “No curves found”.

Hair asset settings.
The “Build strand groups” button regenerates the hair strands. You have to click it every time you make a change in asset settings or reimport the “.abc” file from Blender.
It’s also possible to generate hair without using an Alembic file. E.g. emit a hair strand from every mesh triangle etc.
Hair asset settings
There are a few settings you can adjust when creating the hair asset.
In “Settings Basic”, the Memory Layout describes how the points are stored in the GPU memory. Sequential means that all points for strand N lie right after another. Then all points for strand N+1, etc. Interleaved means that all first points for all strands are stored first. Then every 2nd point from all strands. Repeat for all points. Which one is more performant depends on how the compute shader accesses the data. I recommend checking if there are any FPS changes.
In “Settings Alembic”, Resample Curves is recommended. The asset you have exported probably has different distances between each point of each strand. For example, the distance from the strand’s root to the 2nd point is 4 cm, while from the 2nd to the 3rd is 2 cm. It’s even possible that not all curves have the same number of points. Resample resolution dictates the number of points in each strand. Each point will be spaced evenly. It’s recommended that this number is a power or multiply of 2. The more points, the more smooth and computationally expensive the hair is. Resample quality is an implementation detail of the resample algorithm. Due to the curvature of each strand, it’s impossible to predict what is the best distance between each point. The last segment will always be a bit shorter/longer. To solve this, the algorithm runs in a few iterations. I doubt you will notice a difference if you change it from the default 3.
Resample resolution depends on many factors. Short, straight hair does not need many points. Wavy, shoulder-length is a bit more complex. Heavy curls? Forget. While buns have a tight shape, they are quite small. I’d say a few “runaway” strands even add to the appeal. For long braids, I would consider a separate mesh that grows new hair along its length. Even for simpler hairstyles, it’s common to create separate assets instead of one-size-fits-all. E.g. a common addition to buns are short hairs around the nape, which do not need much resolution. Another example is a hime cut, where you can separate the fringe and both sides into 3 distinct parts.
UV resolve options are used when sampling textures. Imagine some hair strands in the same hair system are red and some are blue. The UV for each strand may be encoded in a strand itself. Or it is based on the base mesh we grew the hair from. If you have unwrapped the mesh in Blender, set “Root UV” to “Resolve From Mesh” and in “Root UV Mesh” pick the mesh from the “.abc” file.
Proportions allow you to assign the width of each strand. With Blender, this is not exported. Use the “fallback” controls instead. The Tip Scale option allows you to make the tip of each strand thinner than the root. Examples:
- Set Strand Diameter Fallback = 1 and Tip Scale Fallback = 1 to have rectangular strips.
- Set Strand Diameter Fallback = 1, Tip Scale Fallback = 0, and Tip Scale Fallback Offset = 0, to have triangular strips.
LOD settings control the level of detail when viewing the hair from different distances. No need for 100000 strands when the object is far away. Exact values depend on your use case. Use Base LOD Cluster Quantity to control how many LOD levels to create. In the Inspector’s preview window (scroll down) you can see each LOD and check the strand count (expand “Lod Guide Count”). I’m not sure if using hair cards for LOD would not be a generally better idea.
Do not forget to click the “Build strand groups” button after each change. The “Memory layout” and “Resample” options might clue you that the hair asset reshapes the curves from the Alembic file into a more Unity-friendly representation. From now on, you will only operate on this format.
Creating hair instance
Time to create an empty Game Object and assign a Hair Instance (Script) component to it. In System Contents assign the hair asset. This will make the hair appear in the viewport.
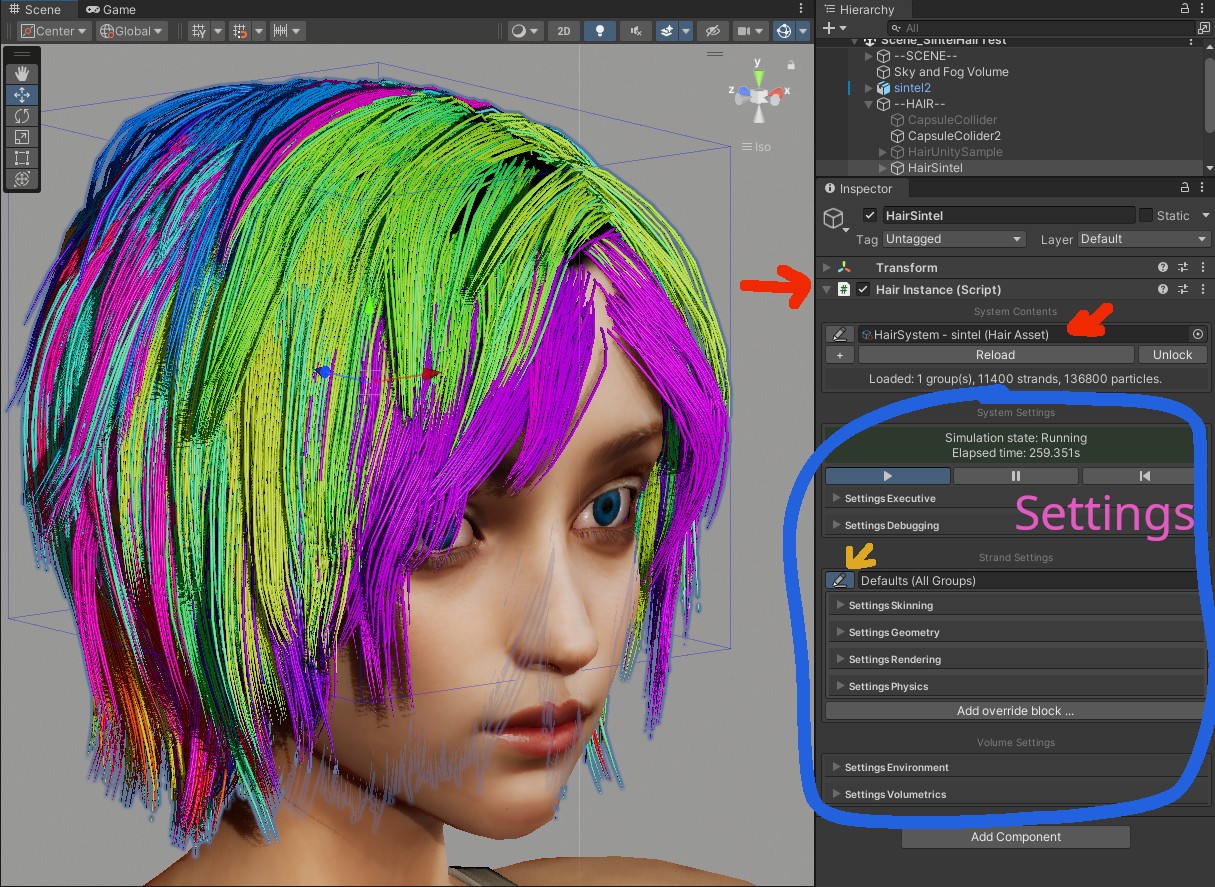
Sintel’s original hairstyle imported into Unity. This is the default hair shader that visualizes hair clumps. Required steps are marked with red arrows. The big blue “Settings” box are all options used to configure hair rendering and physics. Do not miss the yellow arrow next to the strand group. It toggles the section for more adjustments for a subset of the hair strands.
Scaling the game object might work differently than expected. It does not affect hair length, just increases distances between hair roots. Instead, go back to the Alembic file’s “Inspector” and adjust the “Scale Factor”. Then click “Build strand groups” in the hair asset to resample strands after the change. Alternatively, your new object also has “Strand Length” under “Settings Geometry”. It’s right next to “Strand Diameter”.
If the hair does not look OK, it’s either because of the scale (see above) or because it’s already affected by gravity. In the hair instance component, go to “Volume Settings” -> “Settings Environment” and set “Gravity Scale” to 0.
Hair instance settings
In this section, we will discuss settings that affect all strand groups added to the game object. The “Strand Settings” allows you to configure a subset of strands. I will describe it in the “Hair instance - strand group settings”.
Settings Executive
Settings Executive contains settings related to simulation timesteps. You can choose to simulate hair e.g. 30 times per second. Due to how Unity works, it will accumulate time since the last update. Then it retroactively checks how many updates it missed. If the last hair update was 80ms ago and the update is at 30Hz (every ~33.3 ms), it will simulate hair 2 times in a row. Use Update Steps Min and Update Steps Max to control this. Later on, you will learn about “Solver Substeps”, which split each simulation into smaller steps.
Settings Environment
Settings Environment describes gravity, wind, and colliders. Gravity should be self-explanatory. We will look at wind and colliders later.
Settings Volumetrics
I’m not going to explain this in much detail, as I’m not exactly sure about this part. You will get my best guess. The HairSimComputeVolume.compute is 1600 lines long. And that’s a physics simulation, not some mundane React components.
In hair systems, some properties are accumulated over a grid to make it easier/faster to compute. For example, we want hair strands to collide with each other. But with thousands of strands, it’s impossible to calculate this in real-time. This is approximated by moving hairs around so that they take up more space. We can detect dense areas, and calculate gradient vectors. They point to neighboring grid cells/points that are least occupied. Different grids solve different problems. As for velocity, you might notice that some singular hair strands flutter too much. The velocity grid averages the velocity of nearby hair points. This leads to more stable motion (which is good). But you lose on the tiny simulation details that often bring it to life. There is usually a “friction” parameter that allows to mix both solutions. Another often-seen example is the wind/aero grid. It allows for wind to be affected by colliders. Think of an obstacle between the wind source and hair. If someone wanted, they could insert a complete fluid simulation here. Nice vortices and turbulence? Probably not in a video game. But if you want to make a movie…
I’m not sure what all of Unity’s grids do. With the above examples, you should have an intuitive understanding of how grid points make complex hair behaviors possible. In Unity, there seem to be following grids:
- Weight.
- Velocity.
- Density.
- Divergence.
- Pressure. Comment in code points to GPU Gems: Chapter 38. Fast Fluid Dynamics Simulation on the GPU.
- Pressure gradient.
- Scattering.
- Impulse.
Hair instance - strand group settings
Let’s go back to “Strand Settings”. Each “Hair Instance” component allows you to link many hair assets. Some settings can be adjusted for each asset individually. Next to each group, there is a sneaky edit button. It will allow you to e.g. assign different materials to assets in this group. At least 1 strand settings are required to act as the default.
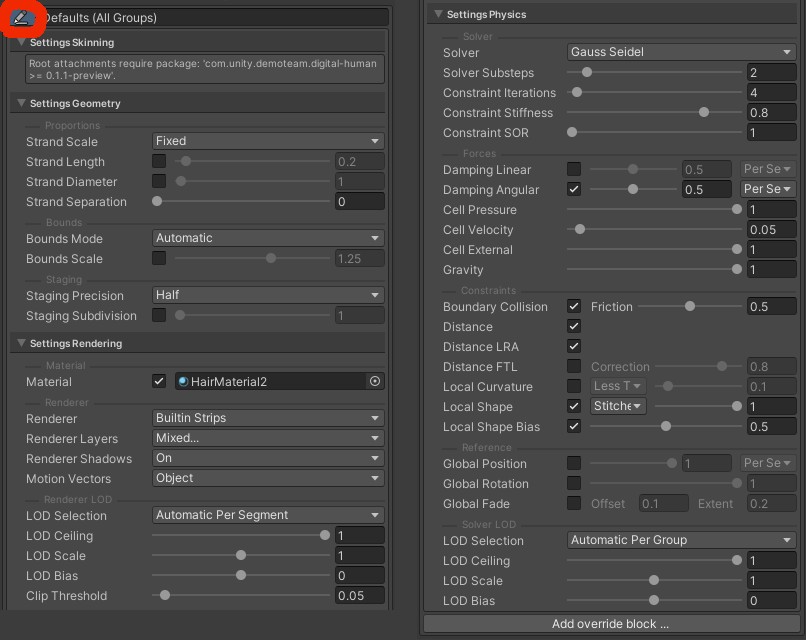
Unity hair group settings. That’s a lot of options! None of this has even a word in official Unity’s documentation.
Settings Skinning
Settings Skinning requires com.unity.demoteam.digital-human package. I doubt you will ever use it. While it allows e.g. skin wrinkling, it was, well.. not created to be reusable. There are scenarios where this functionality would be useful. E.g. since all humans have fuzz hair all over the body, wrinkles might affect roots. Or when the underlying geometry is affected by many skeleton bones.
Settings Geometry
Settings Geometry allows to override both strand length and diameter. Switching diameter does not work with all strand renderers (e.g. lines). Strand Separation allows you to spread the hair tips from each other.
Bounds leave to automatic. In the current com.unity.demoteam.hair version, the widget seems to be broken.
Staging refers to the compression of position data between physics simulation and renderer. “Full” stores data as Vector3, while “Half” uses Vector2. At the end of the physics simulation, there is a staging compute shader that writes this data. The only code path that calls _StagingVertex.LoadX() is from the renderer.
Settings Rendering
Finally! You can override the hair color. Use HairMaterialdefaultLitSRP as a base. It should be already accessible through the com.unity.demoteam.hair package. Hair uses a special shader. You need to add a HairVertex node and connect its properties to the vertex’s position, normal, tangent, and velocity. Fragment’s normal (tangent space) is usually recommended too. See the “Adding materials” section below for a full explanation.
Each strand is a collection of points connected by lines. In math, lines do not have width. So how do you render the strand? In Unity this is determined by the Renderer:
- None. Does not render hair.
- Buildin Lines. When you draw a triangle everyone assumes it’s gonna be “filled” (rasterized). But why not draw only the edges, if this is the effect you want? Think how many times you overlaid wireframes on top of the objects. In this mode, you do not deal with triangles. Remember, these lines will be thin (not adjustable). Some graphic APIs even have this feature built-in (
GL_LINESin OpenGL). Certain settings are not available in this mode. Can look good if you have tons of strands. - Buildin Strips. This is the mode you usually want. Each point expands into 2 vertices. Four vertices between 2 consecutive points create a quad. The vertex positions are calculated based on the direction vector between both points (tangent) and the direction to the camera. Each vertex is moved
hairWidth / 2away from the point that created it (see image below). In some distant way, this is like billboards. This approach may produce long, thin triangles, which can be a problem for the GPU. - Buildin Tubes. Seems to be similar to strips. Instead of a single flat plane, it renders all 4 sides of each segment (front, back, both sides). Check the original PR and the “drawing” in the code docs.
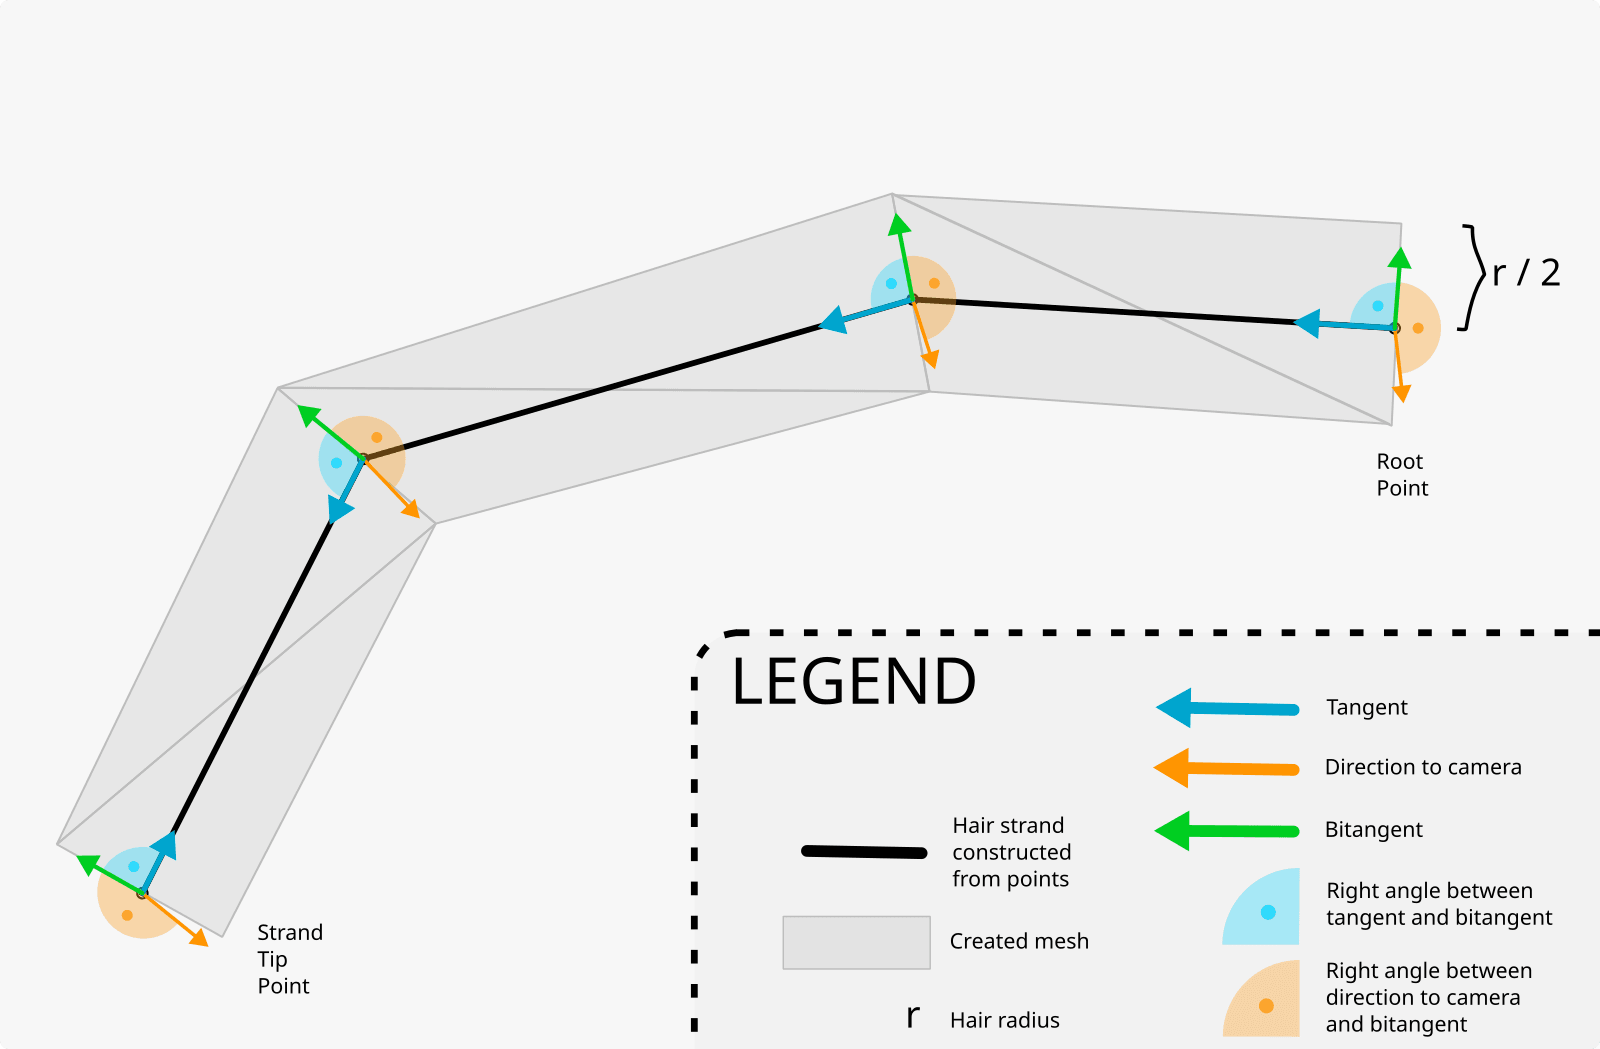
Algorithm for strips renderer. Tangent - vector toward the next point (unless it’s a tip/last point). Bitangent - a vector at a right angle to both tangent and vector-towards-camera. Each mesh’s vertex is created by moving half of the hair radius along the bitangent (either in the positive or negative direction). An alternative way to visualize this is to imagine a plane created from tangent and “to camera” vectors. Bitangent is the normal vector of this plane.
Each of the techniques works better with anti-aliasing.
As with all Unity render settings, you can adjust layers. There is also an option for hair self-shadowing (Renderer Shadows) and LOD selection.
The Clip Threshold discards pixels below the coverage threshold. The calculation seems to depend solely on the distance from the camera. Closer fragments have bigger coverage.
In TressFX there is a concept called pixel coverage (which is missing from Unity’s implementation). Tiny hair strand may not cover the whole pixel. Given how hair is rasterized, the pixel coverage is calculated in the fragment shader. E.g. if only 80% of the pixel is covered in hair, the alpha would be 0.8. As you might know, transparent objects have to be rendered in a specific order. And each of your thousand hair strands can be transparent. This forces using Order-independent transparency (OIT), usually implemented as Per-Pixel Linked Lists (PPLL). This is exactly how it worked in TressFX.
Settings Physics
Reverse engineering physics is not fun. I’ve simplified the explanations where possible. There is a high chance I got something wrong anyway.
Solver
Solver refers to the method used to solve a system of linear equations. You can choose from Gauss–Seidel or Jacobi methods. A lot of constraints and collisions influence the final position. Fixing one may invalidate another. With subsequent iterations, we get consecutively less wrong results with respect to all considered constraints. I recommend leaving the default Gauss–Seidel. It should be the fastest and most accurate/stable enough.
You can adjust Solver Substeps per each update. E.g. instead of simulating the hair once per update and multiplying by deltaTime, simulate it 4 times in a row and multiply it by deltaTime/4 each time. From HairSim.cs:
solverConstants._DT = deltaTime / Mathf.Max(1, settingsPhysics.solverSubsteps);solverConstants._Substeps = (uint)Mathf.Max(1, settingsPhysics.solverSubsteps);
Later on used to drive the for-loop.
Assume you have 3 substeps and an update rate of 30Hz (every ~33.3 ms). If the last hair update was 80ms ago it will update the hair 2 times. Each update will have 3 substeps (each using delta time ~11.1ms). In total, it does the simulation 6 times during this frame.
More substeps mean more work for the GPU, but more accurate results. This is particularly important for collisions. I recommend being conservative due to a possible FPS hit.
Constraint iterations. During the simulation, the compute shader repeats the calculations, each time getting a better result. This is another multiplier on top of substeps and “Update Steps Max”. This time, the for-loop is inside the compute shader. There are some small differences in the actual purpose of these settings, but they are quite subtle. I’m not 100% sure I got them correctly, so I will just inform you what performance impact can be expected.
Constraint Stiffness determines how much the constraints affect the outcome. Each subsequent constraint iteration (see above) has lower stiffness. If there is only 1 iteration, this parameter has a linear outcome. Setting this to 0 removes most of the constraints and the hair may go haywire. This can be useful for non-dynamic hair. Setting this to 1 will strongly enforce all constraints, which may lead to instability. I recommend adjusting this based on the stability of the system.
Constraint SOR. The tooltip says “successive over-relaxation factor”. I’m not even going to guess from the code.
Forces
Damping limits the delta between simulation steps. Imagine a lerp(position_previous, position_next, 1 - damping). This refers to a global point position (expressed as position change - velocity), or relative to the previous point on the curve. The code is a bit more complicated than that, but that’s a good intuition. This is your primary setting to adjust (along with constraint stiffness) if the system is not stable.
Cell settings are related to volume-based physics. See “Settings Volumetrics” above.
Gravity allows you to change the gravity force defined for the whole hair system. Acts as a multiplier.
Constraints
Constraints are a set of rules the hair should follow. E.g. each strand should have a certain length and shape. Imagine that a strong wind blows and the hair is suddenly 1m longer. The problem arises if the constraints conflict with each other. This is what makes hair physics complicated.
No constraint or force can move the root point of each strand. Only subsequent points are influenced. In code, this is expressed as a multiplicative weight that is either 0 or 1. Only the game object’s transformation (e.g. rig or Unity’s object hierarchy) affects the position of the strand’s root. It will always stay on the scalp.
Boundary Collision allows to turn all collisions ON/OFF. This includes both Unity build-in colliders (e.g. “Capsule Collider”) as well as SDF colliders.
Distance constraint preserves initial distances (based on the original hair asset) between subsequent points. In code, stiffness is hardcoded to 1.0. This means that each strand segment will never change its length. No matter what forces you apply. Imagine hair that gets longer the stronger the wind blows! This constraint brings both points closer together (it cannot move the strand’s root). I recommend double-checking this is ON and never touching it again.
Distance LRA constraint. LRA stands for “Long Range Attachments”. Introduced by Kim12. It calculates the distance from the strand’s root to every subsequent point. Each point needs to be within this distance at any point in time. If it is further, it is reprojected back. From the original paper:
For every unconstrained particle i, we pre-compute the initial distance from the particle to the attachment point. During the simulation, if the particle is within this distance, we allow it to freely move. If the particle moves beyond this limit, we project it back to the surface of a sphere centered at the attachment point with radius .
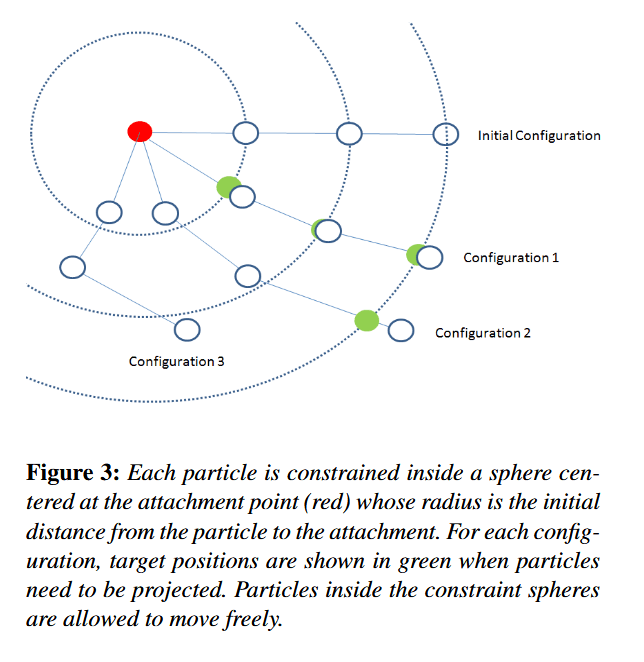
Original drawing from [Kim12].
I recommend having this constraint ON. From what I have heard, it might make the hair feel “bouncy”, but it’s a useful addition to a “normal” distance constraint.
Distance FTL constraint. FTL stands for Follow-The-Leader. Introduced by “Fast Simulation of Inextensible Hair and Fur” (Muler12). It’s the same as the distance constraint discussed above but moves only the latter point. It has adjustable correction. I recommend checking if (given other length constraints) you need this.
Local Curvature constraint based on “A Triangle Bending Constraint Model for Position-Based Dynamics” (Kelager10). This paper has a more complicated geometric representation. Yet the main idea is simple. From 3 subsequent points (P1, P2, P3) create a triangle. Calculate the distance from the average point (P1.xyz + P2.xyz + P3.xyz) / 3 to the middle point P2. Apply correction to the position of P1, P2, and P3 based on the change wrt. initial distance. More expensive calculations can use the median intersection. I recommend leaving the default value - OFF.
Local shape constraint (and SolveMaterialFrameBendTwistConstraint()) based on “Position and Orientation Based Cosserat Rods” (Kugelstadt16). I gave up reading on page 4. This LSC implementation is not what was used in TressFX. I assume it tries to preserve the direction vector (tangent) between 2 subsequent points. Imagine curly hair. Each strand has the shape of a 3D spiral. We want to persist in this shape no matter what happens to the rest of the strand. If there is a strong wind, the displaced hair will still be curly. Some hairstyles do not work without this constraint. Still, like all constraints, this solution limits the range of motion available.
Reference
Global shape constraints (rotation) are a lerp between the current position/rotation and the initial position/rotation from the original hair asset. The fade parameter has offset and extent. Both control how far from the root this constraint will work. Assuming offset = 0.2 and extent = 0.4:
- Points from root to 20% of the strand length: fully affected by the global constraint.
- Points from 20% to 60% of the strand length: affected progressively less (linear).
- Points from 60% of the strand length to the tip: not affected by the constraint.
You can see this for yourself by plotting 1.0 - max(0, min(1, (x-0.2) / 0.4)) for x from 0 to 1 or adapting pseudocode:
float GetGlobalParamAttenuation(uint strandIndex, uint strandParticleNumber){const x = strandParticleNumber / (_StrandParticleCount - 1);return 1.0 - saturate((x - _GlobalFadeOffset) / _GlobalFadeExtent);}
We have now gone over most of the hair system settings. We can finally go back to adding things to our scene! Of course, if you yearn for more theoretical stuff, feel free to read the linked papers.
Adding materials
I’ve previously mentioned that com.unity.demoteam.hair already ships with the basic HairMaterialdefaultLitSRP material. Turns out, you cannot use the default HDRP/Lit like on any other object. You need to add a HairVertex node and connect its properties to the output vertex’s position, normal, tangent, and velocity. As well as the fragment’s “Normal (Tangent Space)“.

Simplest possible shader graph for hair material. Contains one parameter: “Base color”. Every other connection is required for hair to display correctly.
The HairVertex node is actually a subgraph that wraps HairVertex.hlsl. On line 370 there is a definition of the nodes output. I will assume you are using “Buildin Strips” as a renderer.
surfacePositionOS, surfaceNormalOS, surfaceTangentOS, and surfaceVelocityOS depend on the viewing angle. To debug, pass the values through “Normalize” and “Absolute” nodes, and output them as color. For example, surfaceNormalOS when viewed from an object’s front will be predominantly blue. Blue is the color of the Z-axis (front-back). surfaceTangentOS is always at a 90-degree angle to the normal. All object space values depend on the camera position due to how the strips renderer works. Neither of these properties is particularly useful when developing materials. Connect them to the respective vertex’s properties.
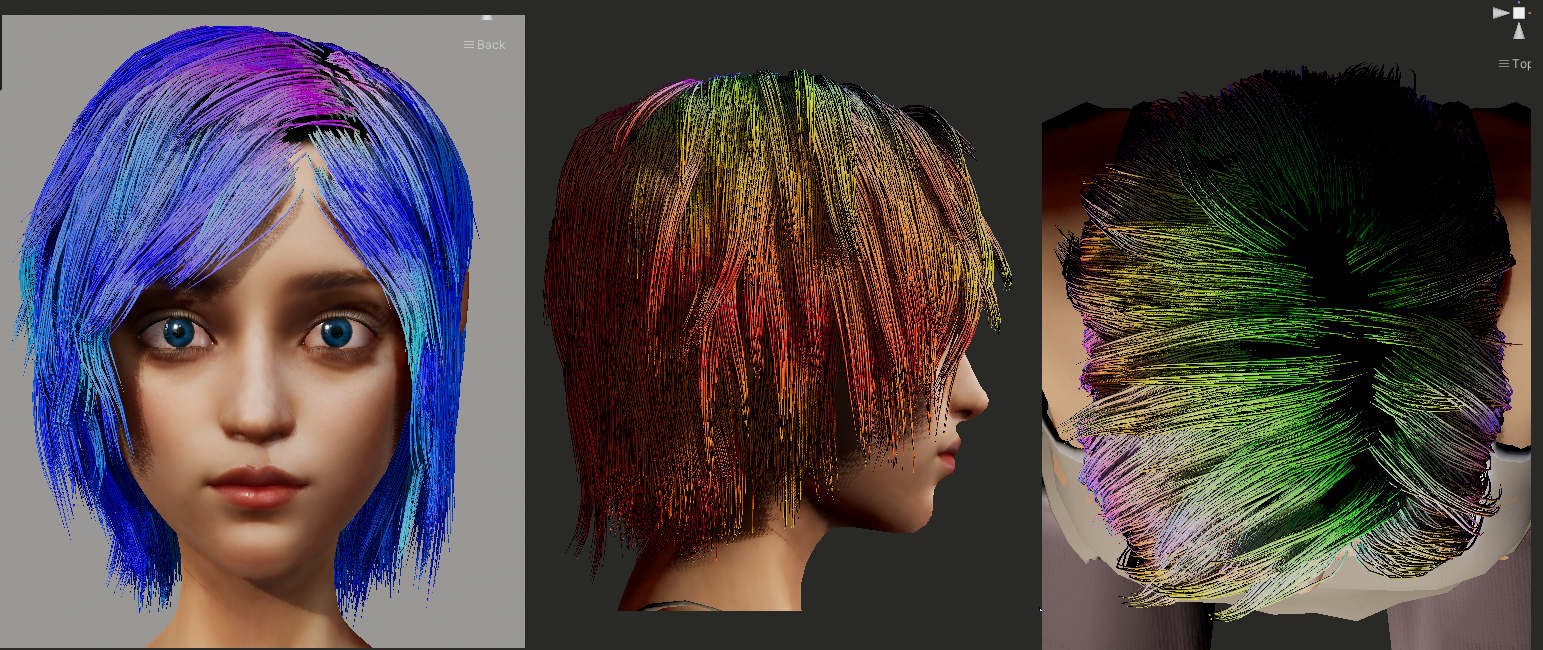
Visualization of surfaceNormalOS vectors.
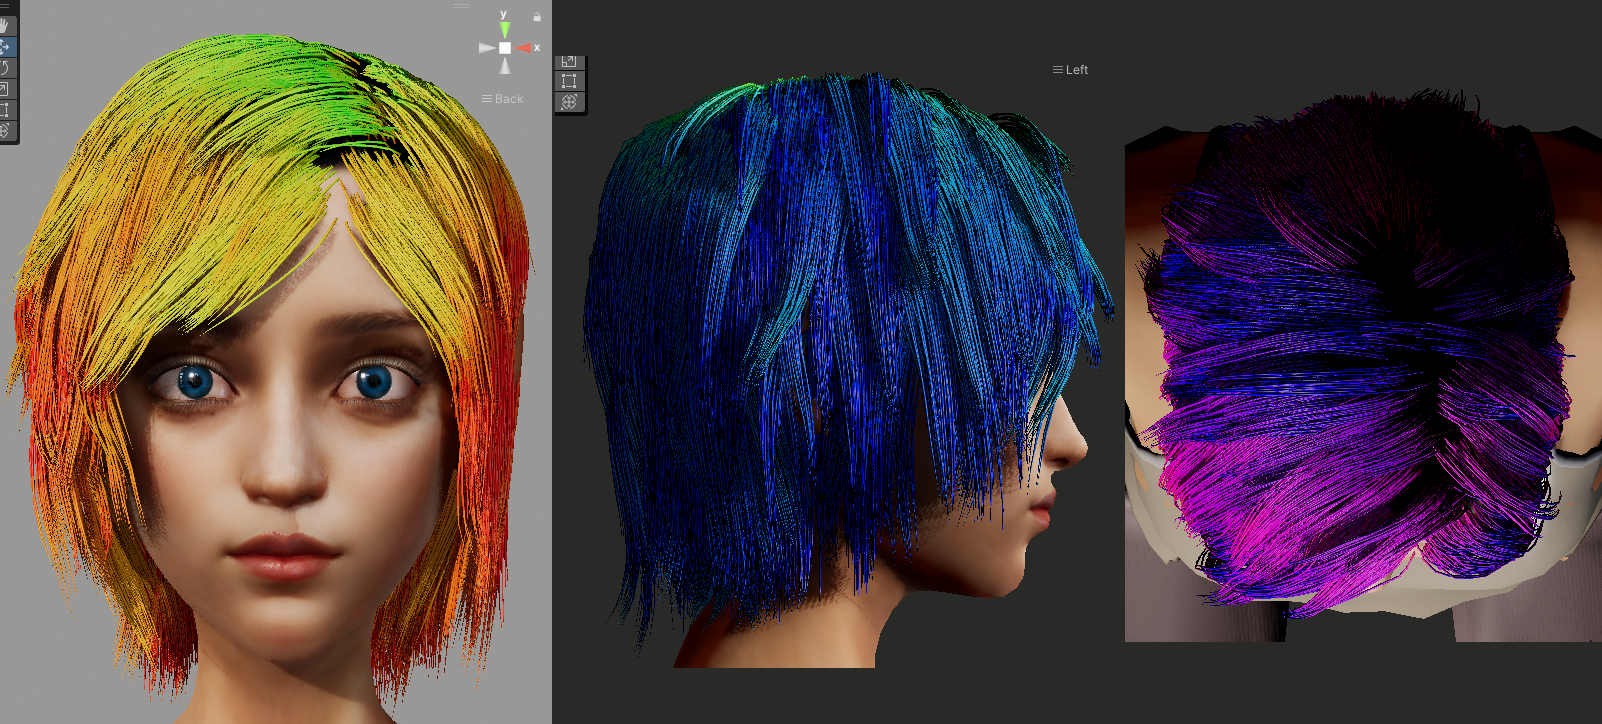
Visualization of surfaceTangentOS vectors.
surfaceNormalTS - no idea. The name makes sense, but the values I get do not. Connect it to the fragment’s “Normal (Tangent Space)“.
surfaceUV describes the fragment’s position within the strip. Imagine a vertical strip of hair (the hair is “dangling” down). Values for surfaceUV.x go 0 to 1 from the left to the right edge. Values for surfaceUV.y go from 0 at the strand’s root, to 1 at the tip. The values are linear, so the usual perceptual problems might arise during the visualization.
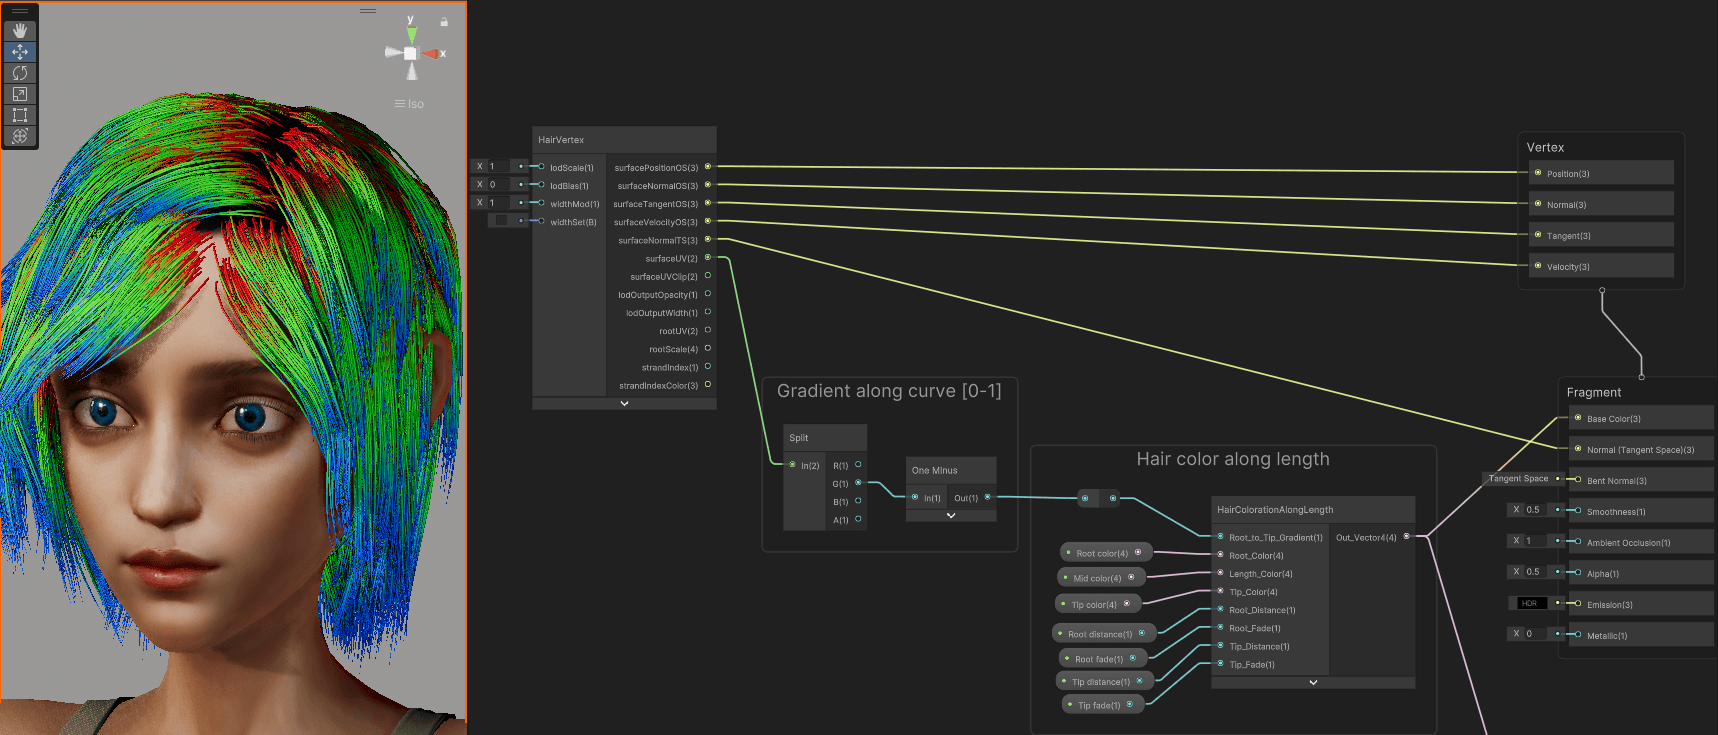
The color gradient along the strand’s length using surfaceUV.y. It uses the HairColorationAlongLength subgraph that mixes 3 colors based on the “Root_to_Tip_Gradient” float.
surfaceUVClip = GetSurfaceUV(id.tubularUV) * float2(1.0, _RootScale[strandIndex].x);. Your guess is as good as mine. It may be surfaceUV scaled based on the longest single hair in the hair group? That would mean it’s no longer bound to 0-1, but between 0 and the longest hair length in real-world units (see definition of rootScale.x below).
lodOutputOpacity has a comment in the code: “TODO reserved for later use”.
lodOutputWidth radius of the hair strand at the fragment’s position. If the hair asset has thin tips (see “Tip Scale Fallback”), the width changes along the strand.
rootUV is the UV you have set in the asset’s UV resolve. Use texture to drive the color of the hair. “Resolve From Mesh” is based on the closest triangle.
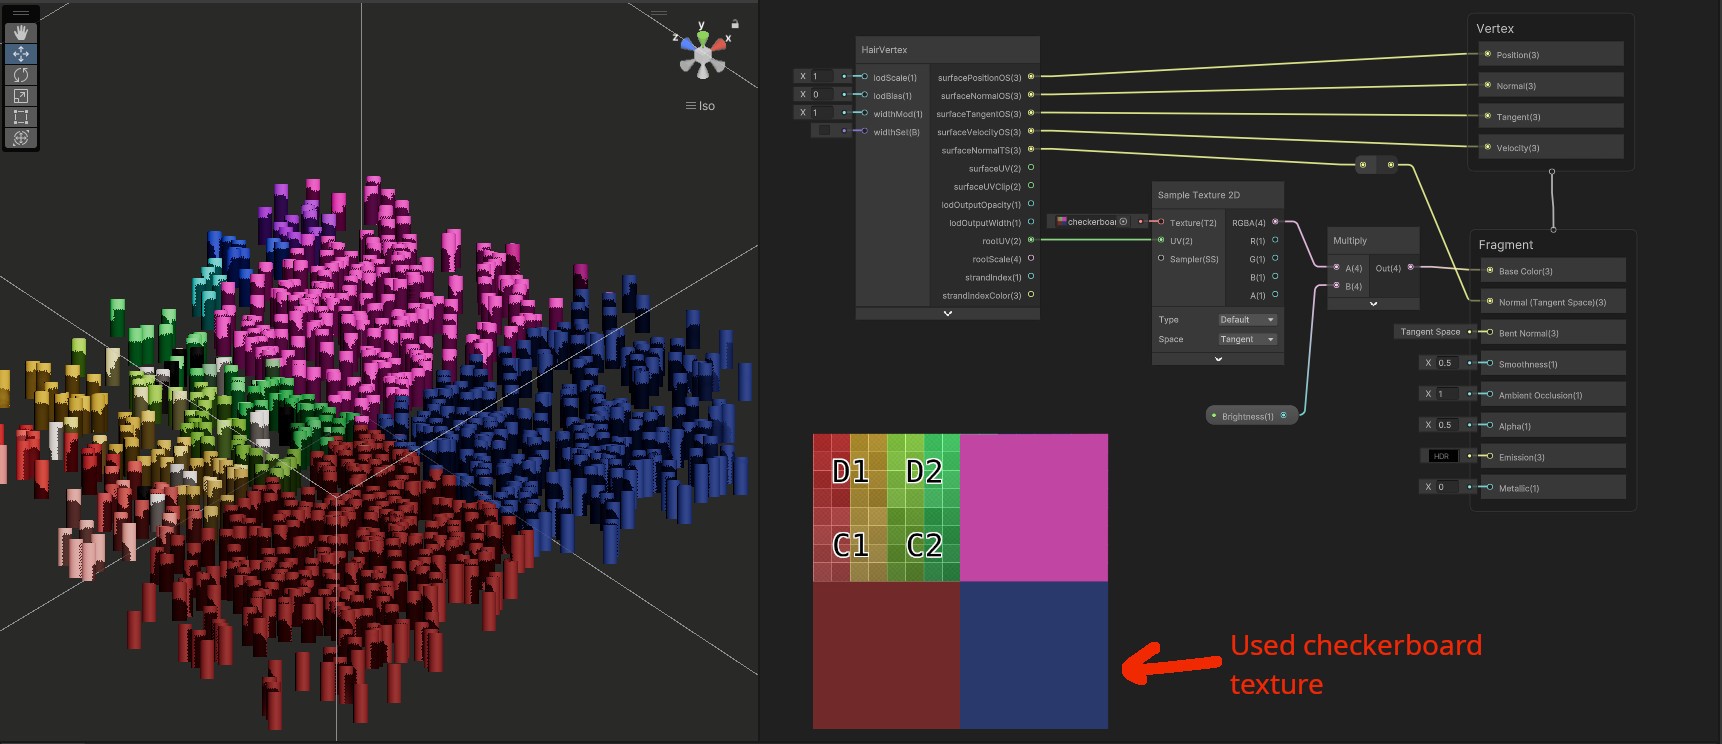
Hair strands with color based on the texture. Blender can occasionally place hair strands outside of the base mesh, which can lead to color leaking along the borders. Can be mitigated using the texture’s tiling options.
rootScale is based on the hair asset’s “Proportions” section:
- x - strand’s length. Normalized to maximum within the group.
- y - hair assets’ “Strand Diameter Fallback”. Normalized to maximum within the group.
- z - hair assets’ “Tip Scale Fallback Offset”.
- w - hair assets’ “Tip Scale Fallback”.
strandIndex is a unique ID of this strand.
strandIndexColor is a random color based on strandIndex.
Hair materials - inspiration
Making the hair look “right” is challenging. Here are a few links:
- Unity’s “Enemies” demo. You can download their whole project and copy their shader. This entire article is about the hair system used in that video after all.
- Marschner and Kajiya-Kay shaders. Chances are, your shader will be based on one of them.
- “Hair Shaders - Advanced Materials - Episode 13” by Ben Cloward gives an excellent overview of Unity’s hair sample materials.
- Sakura Rabbit’s Youtube channel. Well known in the community for amazing characters. She was even mentioned by Unity’s CEO once. She uses hair strands too, but not sure if it’s
com.unity.demoteam.hairor some other asset. - “Insights of Creating Characters for Uncharted 4”. This is not related to Unity, but it’s one of my favorite presentations ever! Turns out, that adding a bit of reddish fake SSS works for any hair color. It imitates softness. The slides seem to have vanished from the internet, but the video from ZBrush Summit is still up.
Hair Forces
To specify gravity, set the vector and force for the whole Hair System inside “Settings Environment” -> “Gravity”. Each strand group can change the magnitude under “Strand Group properties” -> “Settings Physics” -> “Forces” -> “Gravity”. In code, there is GetVolumeGravity() if you are curious about implementation.
To add the wind, create a new game object with the Hair Wind component. Adjust its speed, and pulse (amplitude, frequency, randomness). As for the shape:
- Directional affects the whole scene.
- Spherical imitates explosion or implosion, depending on the “Base Speed” sign.
- Turbine is a cylinder with adjustable nozzle widths.
- Any. Not tested.
This should already affect the hair systems in the scene. Further hair instance configuration:
- “Settings Environment” -> “Wind” to include/exclude wind sources.
- “Settings Volumetrics” -> “Wind & Drag” to configure strength.
- “Strand Group properties” -> “Settings Physics” -> “Forces” -> “Cell Pressure/Velocity/External” to make adjustments on a per-group basis.
Collision capsules
Unity’s hair works with the following collider components out of the box:
- “Capsule Collider”,
- “Box Collider”,
- “Sphere Collider”.
Using a collision sphere to disrupt the hair. FUN!
Additionally, you can toggle or tune collisions using the following settings:
- For the whole system: “Settings Environment” -> “Boundary Capture”.
- The margin property allows you to adjust minimal separation distance.
- For strand group: “Strand Group properties” -> “Settings Physics” -> “Constraints” -> “Boundary Collision”.
There seems to be a limit on the number of colliders (max 8). In that case, “Boundary Resident” colliders will be always prioritized. There should be an editor warning in case of overflow.
If you are working on a human character, the thing to watch for is always a collision between the face and the hair. Strands piercing the nose or going “into” the cheeks tend to distract the viewers. You could try to insert enough primitive colliders to prevent this. A better way is to use Signed Distance Fields (SDF).
Signed Distance Field collisions
In Unity, primitive colliders are common. E.g. for sphere collisions, you calculate the distance between centers and compare it to the sum of radii. Yet rarely an object is a perfect sphere. Often, there is a simplified invisible version of the mesh only for collision purposes. Unfortunately, collision detection between thousands of hair strands and hundreds of triangles is expensive. This is solved using Signed Distance Fields (SDF).
At the heart of SDF is a 3D texture. While 2D texture represents an image, 3D texture describes a volume in a 3D space. Think about it as a grid subdivided into cells. Query it with 3 coordinates and it returns a value. Due to memory constraints, each dimension is usually small. Example size is 64x64x64 (total of 262144 values). Just like you can set a 2D image’s pixel with coordinates (4, 19) to a red color, you can also set a 3D texture’s cell (5, 15, 42) to some value. The magic part is texture filtering/sampling. It’s possible to get the value for a point “between” the cells e.g. (4.12, 32.3, 12.1). The result will be proportionally derived from the nearest 8 cells. This is exactly like bilinear interpolation, but this time in 3D.
SDF uses 3D texture to store the distance to the nearest surface for each cell center. The value is positive if the cell center is outside a mesh, and negative otherwise (is inside). For each hair strand’s point, we can now ask: “How close is the nearest surface?“. This simplifies the collision code while being quite efficient. Here are the steps:
- Convert the mesh (e.g. human bust constructed of triangles) into SDF. Write the result into SDF_texture.
- For each hair strand in hair:
- For each point in hair strand:
- let distance = sample3DTexture(SDF_texture, point.xyz)
- if distance is negative then move the point outside
- For each point in hair strand:
There are efficient algorithms to achieve all the above operations. As a thought exercise, consider what is a gradient in SDF.
Using SDF collisions with Unity hair
You won’t believe my surprise, but the SDF part of Unity’s hair tutorial is, for once, quite good. It actually tells the user what to click.
Firstly, install com.unity.demoteam.mesh-to-sdf extension using the git link: https://github.com/Unity-Technologies/com.unity.demoteam.mesh-to-sdf.git. You can find the documentation inside the repo’s Documentation folder.
Once done:
- In the “Project” window create a new Custom Render Texture. Set the dimension to 3D. The size does not matter, as we will override it later. The format will be
R16_SFLOAT(will be set automatically later). - Create a 3D volume for which we record SDF:
- In the “Hierarchy” window create a new empty object. Add an “SDF Texture” component to it. Assign the 3D texture we have created.
- Place the created object near the collision mesh (a simplified version of the rendered object). Adjust its size so that it encompasses the object.
- The resolution is usually between 32 and 64.
- Add a “Hair Boundary (Script)” component to it. Set mode to “Bind To Component”, type to “Discrete SDF”, and “SDF Rigid Transform” to the collision mesh.
- Add a “Box Collider” component to it. Set the center to (0, 0, 0) and copy size from the “SDF Texture” component. Check “Is Trigger”.
- The volume is ready to record the meshes. We now need to indicate what is worth recording.
- Add a Mesh To SDF (Script) component to your collision mesh.
- Set the “SDF Texture” to our 3D texture.
- Set “Flood Fill Iterations” to max and quality to “Ultra”. Don’t forget to adjust them later!
- This object should also have either “Skinned Mesh Renderer” or “Mesh Renderer”. Set its “Rendering Layer Mask” to “Nothing” to hide it. Ofc. you can show it for debugging purposes.
- Add “Parent Constraints” pointing to mecanim’s “Head” bone for all required objects. This inherits rig transformation and guarantees correct capture regardless of the animation.
The setup above should be enough for a basic setup. Different hairstyles may interact with collision mesh differently. Most of the time, the hair will just “grow” away from the skin. But imagine afro. It curls around the face, which will “squash” the strands against the collision box. Even if the mesh fits tighter to the face, wind, physics, or animation will still cause the same result. In extreme cases it will literally smash the curls into the collider, resulting in the pancake. Consider higher dampening or magnitude modifiers. Some hair systems allow to ignore collisions on a configurable number of points close to the root. There are also other interactions. Some hairstyles cover ears completely, some will need collision mesh, etc.
ATM we are rerecording the SDF texture every frame. In some cases, you can either precompute it offline or use a custom script to write the SDF only during the very first frame.
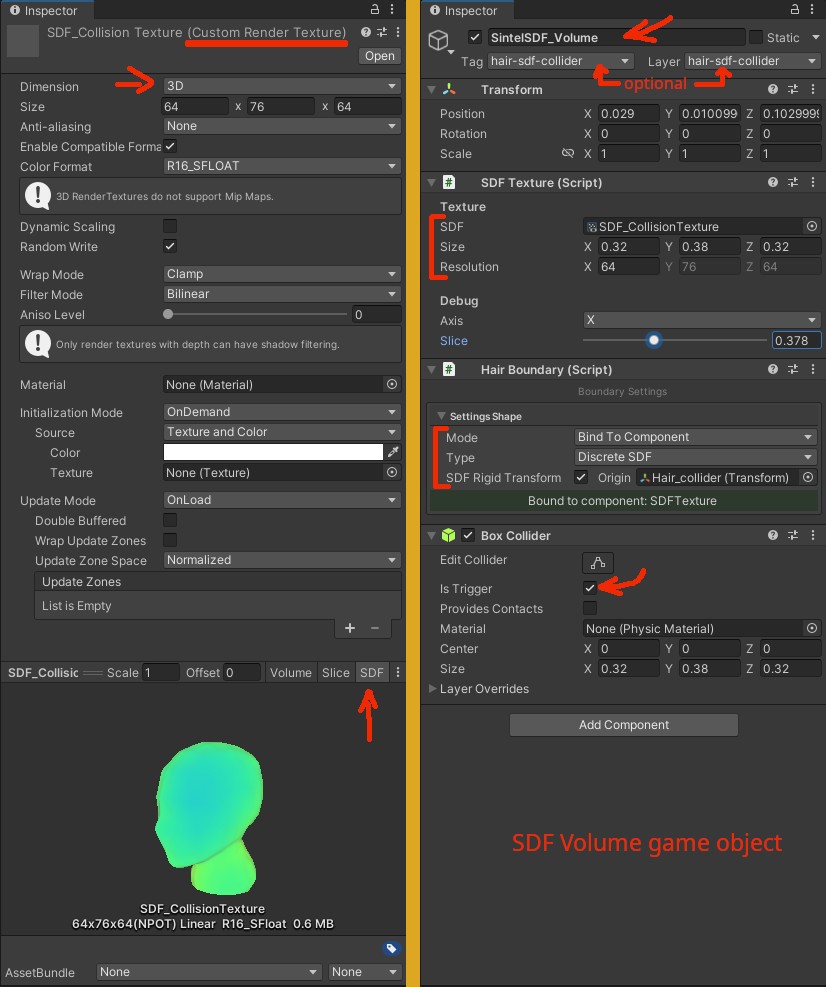
On the left are the settings for the 3D texture. On the right settings for the SDF volume game object.
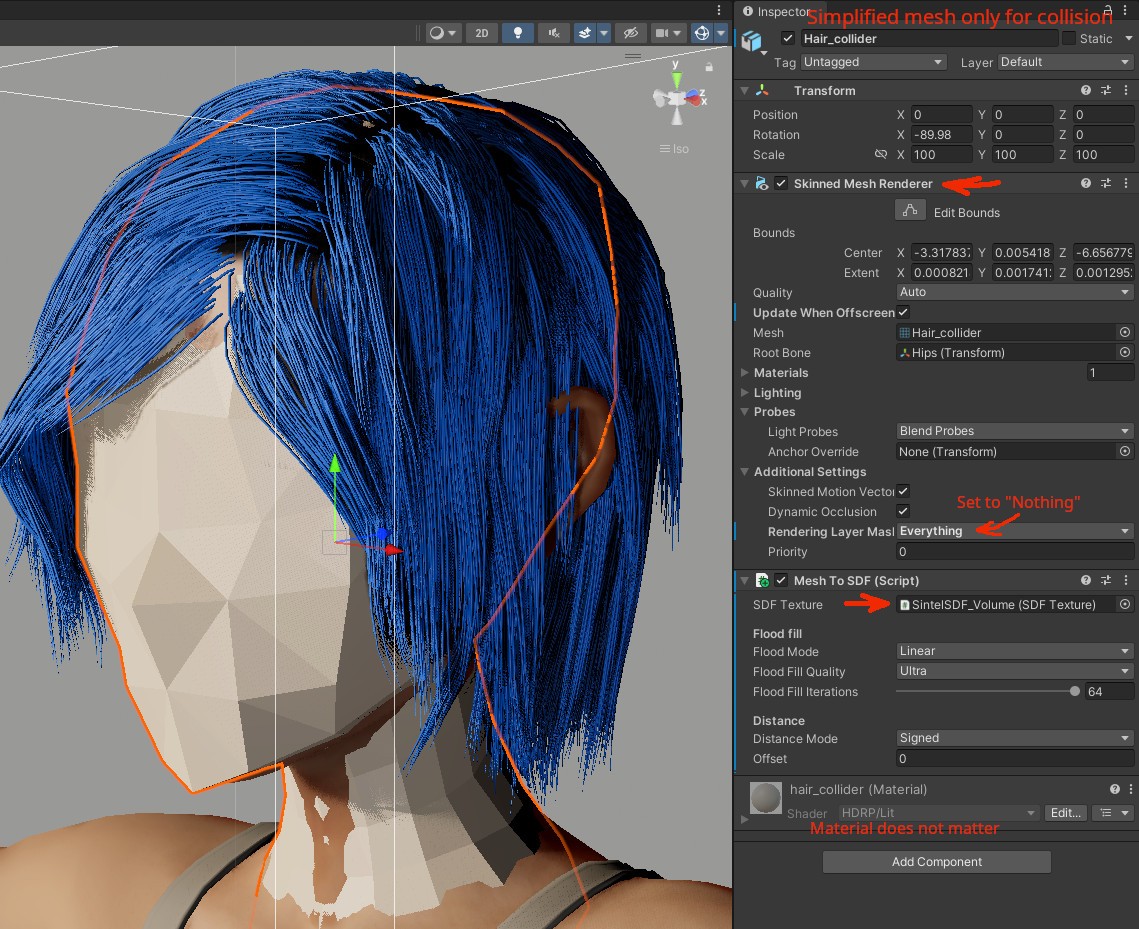
Visualization of the collision mesh. On the right, there are expected settings to capture it in the SDF volume.
Summary
The com.unity.demoteam.hair package was based on the TressFX, but not much seems to be left from AMD’s codebase. I have to say that it works quite well. If it’s unstable, drag the “dampen” parameter to the right or lessen the constraints.
I also recommend watching “Every Strand Counts: Physics and Rendering Behind Frostbite’s Hair” by Robin Taillandier and Jon Valdes as supplementary material.
Few opinions about Unity
When I was an undergraduate at the university, I had to write reports for each submitted program. This is something basic, expected of anyone above junior level. Somehow the authors of Unity’s hair package were able to create 70+ slides for their SIGGRAPH presentation. It’s surely something nice to write on the CV. Yet, at the same time, they can’t be bothered to write down a paragraph on how to change the hair color in their hair package.
The Unity hair system was used in “The Heretic” (2019) and then in “Enemies” (2022). It took me 4 days from reading the first line of code to finishing the first draft of this article. Another 3 days for edits and images. It’s said that time is an abstract concept.