Vulkan initialization
Vulkan is infamous for being both complex and verbose. This is the first article in the series meant to explain all the complexity. Ideal readers should at least skim the Vulkan-tutorial beforehand. I’m not going to provide snippets to copy and paste to assemble the whole program. Instead, we will walk through every API function that we call. We will discuss what is its purpose, and what every parameter represents. I hope it will allow you to make more conscious choices when writing the code.
I’m using Rust and Ash, but I assume C++ developers will not have much problem following the code.
VK_FORMAT_B8G8R8A8_UNORMbecomesvk::Format::B8G8R8A8_UNORM. All functions aresnake_caseand are usually invoked on anash::Deviceobject instead of being global.
Vulkan initialization steps
Following are the Vulkan initialization steps I have used in Rust-Vulkan-TressFX:
- Create a window of predefined size using winit.
- Create Vulkan 1.3 instance enabling e.g.
VK_LAYER_KHRONOS_validationlayer andVK_EXT_debug_utilsextension. - (Optional) Initialize VK_EXT_debug_utils and add
debug_utils_messenger. - Create VkSurfaceKHR as a bridge between OS-backed window and Vulkan.
- List GPUs to select one that matches our requirements. We can filter by properties like support for anisotropic filtering, or storage instructions during fragment shader. We also select the device queue family.
- Create a logical device and queue. We can also:
- Enable features like:
sampler_anisotropy,fragment_stores_and_atomics,independent_blend, separate depth stencil operations or VK_KHR_synchronization2 - Enable device extensions like VK_KHR_swapchain, VK_KHR_push_descriptor, or VK_KHR_shader_non_semantic_info.
- Enable features like:
- Create swapchain:
- Requires surface format(e.g.
VK_FORMAT_B8G8R8A8_UNORMandVK_COLOR_SPACE_SRGB_NONLINEAR_KHR). - For the present mode, use
FIFO_RELAXEDorFIFOif you want VSync. UseMAILBOX/IMMEDIATEotherwise.
- Requires surface format(e.g.
- Create VkImageView for each of the swapchain images.
- Create pipeline cache.
The above steps are mandatory in every Vulkan application. Many applications do the following operations around the same time:
- Create a command pool and command buffers. I’ve only used 1
command bufferper frame in flight as the whole app is quite simple. In a multithreaded app, you often have one command pool per thread. - Initialize AMD Vulkan Memory Allocator. In Rust and Ash, I’ve used vma over vk-mem-rs as it is actively maintained.
- Create some intra-frame synchronization objects. It’s usually something like
acquire_semaphore,rendering_complete_semaphore(sometimes known asrelease_semaphore),queue_submit_finished_fence, etc. We will investigate each of these objects in “Vulkan synchronization”.
Done that, we can move to either render graph initialization (pipelines, render passes) or load our scene (vertex and index buffers, materials, etc.). After all, our Vulkan ‘context’ is initialized and we can start writing our app.
Let’s look at each stage in more detail to discover all the settings that Vulkan offers to the developers.
Creating VkInstance object
After loading Vulkan functions, the first step is to create a new Vulkan instance. For this, we need VkApplicationInfo and the names of enabled validation layers and extensions.
Selecting Vulkan version
When creating VkApplicationInfo you can select the Vulkan version to use. At the time of writing, 1.3 is the latest. In Vulkan, a new feature is proposed as an extension. An example is VK_NV_ray_tracing proposed by NVIDIA. Later it was turned into VK_KHR_ray_tracing_pipeline. KHR signifies that Khronos Group (the body responsible for Vulkan specification) expects the extension to become part of core Vulkan.
You often use the newest Vulkan version. Alternatively, an older one with extra instance/device extensions. The result should be the same. Availability depends both on the GPU model and the driver version.
Vulkan instance extensions
Vulkan instance extensions relate to either Vulkan installation or integration with the operating system. Use vkEnumerateInstanceExtensionProperties() to list available extensions. The vulkan.gpuinfo.org website is a database of GPU and driver capabilities. E.g. there is a page for NVIDIA 4090 with driver 546.29.0.0 on Windows. Most popular instance extensions:
- VK_KHR_surface. Adds
VkSurfaceKHRobjects that serve as a bridge between OS-backed window and Vulkan. You can use it to e.g. query available surface formats(color space andVkFormat). - VK_KHR_win32_surface, VK_KHR_xlib_surface, VK_MVK_macos_surface, VK_KHR_android_surface. Used to create
VkSurfaceKHRbased on the OS window. For example, on Windows, vkCreateWin32SurfaceKHR() uses HINSTANCE and HWND. - VK_EXT_debug_utils. Used to pretty-print validation layer messages, add labels to objects or group commands into logical passes. I’ve written “Debugging Vulkan using RenderDoc” based on this extension.
If you are using ash, just query ash-window’s enumerate_required_extensions(). On Windows, it will return both
VK_KHR_surfaceandVK_KHR_win32_surface.
Vulkan validation layers
Vulkan validation layers are my favorite Vulkan feature. They sit between the app and the driver to guide proper API usage. Access the list of available layers with vkEnumerateInstanceLayerProperties(). Validation layers can:
- Check for invalid parameters. E.g. VkAccessFlagBits2 not matching VkShaderStageFlagBits.
- Detect missing synchronization. E.g. write-after-write access without a barrier.
- Hint on best practices. E.g. don’t use
D32_SFLOATimage format on NVIDIA’s GPU.
I recommend adding VK_LAYER_KHRONOS_validation in your app’s debug build.
You can also enable layers using LunarG’s Vulkan Configurator (part of Vulkan SDK). It’s available in VULKAN_SDK_DIR/<version subdir>/Bin/vkconfig.exe. If you run it alongside your app, it will automatically intercept all API calls.
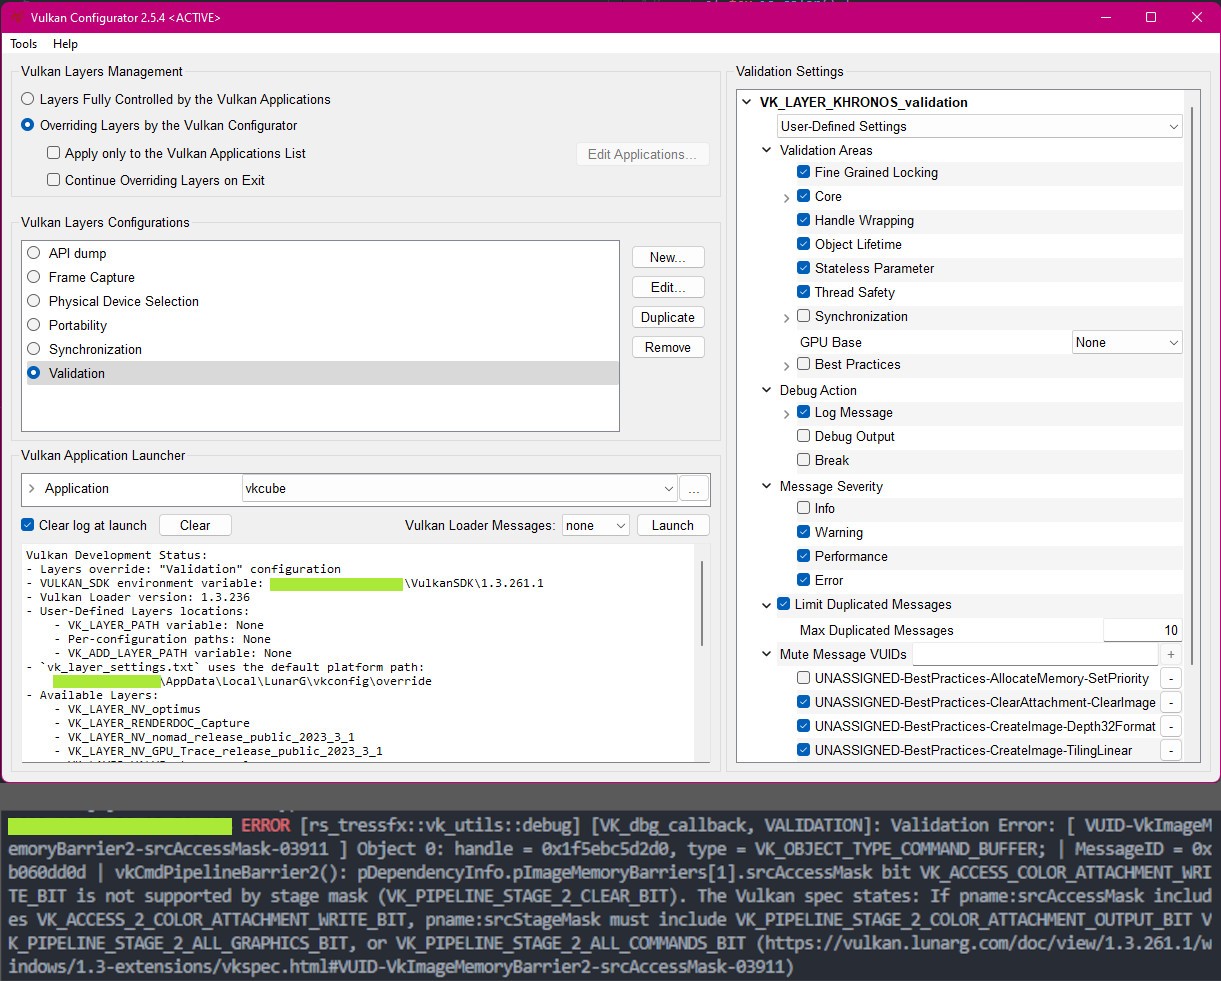
There are a lot of settings in Vulkan Configurator. The error messages are detailed. Functions called with invalid parameters will include a link to the specification.
You can pretty-print the validation messages using the VK_EXT_debug_utils instance extension. After declaring the extension use the following code to set debug callback for messages:
extern "system" fn vulkan_debug_callback(message_severity: vk::DebugUtilsMessageSeverityFlagsEXT,message_type: vk::DebugUtilsMessageTypeFlagsEXT,p_callback_data: *const vk::DebugUtilsMessengerCallbackDataEXT,_user_data: *mut std::os::raw::c_void,) -> vk::Bool32 {let callback_data = unsafe { *p_callback_data };let message = unsafe { CStr::from_ptr(callback_data.p_message).to_string_lossy() };println!("VULKAN_ERR: {}", message);vk::FALSE}pub fn setup_debug_reporting(entry: &ash::Entry, instance: &ash::Instance) {let debug_info = vk::DebugUtilsMessengerCreateInfoEXT::builder().message_severity(vk::DebugUtilsMessageSeverityFlagsEXT::ERROR).message_type(vk::DebugUtilsMessageTypeFlagsEXT::GENERAL).pfn_user_callback(Some(vulkan_debug_callback)).build();let debug_utils_loader = DebugUtils::new(entry, instance);let debug_messenger = unsafe {debug_utils_loader.create_debug_utils_messenger(&debug_info, None).unwrap()};}
Creating VkSurfaceKHR
After we have created VkInstance, it’s time to create VkSurfaceKHR. The exact method depends on your OS and how you have created the app’s main window. Ash contains examples for every OS. On Windows, you can do this using:
#[cfg(target_os = "windows")]pub fn create_surface_khr(entry: &ash::Entry,instance: &ash::Instance,window: &winit::window::Window,) -> vk::SurfaceKHR {use std::ptr;use winapi::shared::windef::HWND;use winapi::um::libloaderapi::GetModuleHandleW;use winit::platform::windows::WindowExtWindows;let hwnd = window.hwnd() as HWND;let hinstance = unsafe { GetModuleHandleW(ptr::null()) as *const libc::c_void };let win32_create_info = vk::Win32SurfaceCreateInfoKHR::builder().hinstance(hinstance).hwnd(hwnd as *const libc::c_void).build();let win32_surface_factory = Win32Surface::new(entry, instance);unsafe {win32_surface_factory.create_win32_surface(&win32_create_info, None).expect("Failed to create win32 surface for khr::Win32Surface extension")}}
There is not much to VkSurfaceKHR, yet we will use it over and over again. You can think of it as a Vulkan’s connection to the OS-backed window. Such a connection is necessary if we want to present the output to the user. Among other things, VkSurfaceKHR is also used to check if the window’s current monitor can handle HDR.
Picking the GPU to create VkDevice and VkQueue
Use vkEnumeratePhysicalDevices() to list GPUs. For each VkPhysicalDevice you can ask for it’s:
- Properties (
vkGetPhysicalDeviceProperties2()). This includes:- name (e.g. “NVIDIA GeForce GTX 1050 Ti”),
- type (e.g.
VK_PHYSICAL_DEVICE_TYPE_DISCRETE_GPU), - driver version,
- limits e.g. number of vertex attributes, viewport count, framebuffer size, etc.
- Features (
vkGetPhysicalDeviceFeatures2()). Tons of flags if the device allows e.g. sampler anisotropy or atomic store from fragment shaders.
Each VkPhysicalDevice offers a list of queue families. First, we need to understand what the queue is in Vulkan. A queue is something you can submit commands to. You create a command buffer and then record commands (e.g. vkCmdDraw(), vkCmdDispatch()) in it. Submitting a command buffer to the queue starts the work on the GPU. Not all queues can do everything. Some are limited to only graphic or transfer jobs. Queue families are collections of queues that have similar capabilities.
Use vkGetPhysicalDeviceQueueFamilyProperties() to list the properties of a queue family. Only VkQueueFlags queueFlags are of any interest here. You should also check that it can present the final image to your VkSurfaceKHR.
I’ve mentioned that we will submit commands to a queue. Unfortunately, having a queue family is not enough to create one. First, you have to create a logical device:
pub unsafe fn create_device_and_queue(instance: &ash::Instance,phys_device: vk::PhysicalDevice,queue_family_index: u32,) -> (ash::Device, vk::Queue) {let queue_prio = [1.0f32]; // only one queuelet queue_create_infos = vk::DeviceQueueCreateInfo::builder().queue_family_index(queue_family_index).queue_priorities(&queue_prio).build();let device_create_info = vk::DeviceCreateInfo::builder().queue_create_infos(&[queue_create_infos]).enabled_extension_names(...) // device extensions - see next section.enabled_features(...).build();let device: ash::Device = instance.create_device(phys_device, &device_create_info, None).expect("Failed to create (logical) device");let queue = device.get_device_queue(queue_family_index, 0); // only one queue created above(device, queue)}
Every time you add a new functionality to your app, you may have to enable a certain feature or device extension. Remember when we called vkGetPhysicalDeviceFeatures() to get features for a physical device? When you create a logical device, you use the same structure to enable selected features. The actual code has some non-obvious parts. Use const void* pNext field to declare features not available in the VkPhysicalDeviceFeatures struct. This is required to enable VkPhysicalDeviceSynchronization2FeaturesKHR and VkPhysicalDeviceSeparateDepthStencilLayoutsFeatures. I have an example in my Rust-Vulkan-TressFX’s pick_device_and_queue().
Using devices in Vulkan involves many steps. Here is a quick summary:
- Call vkEnumeratePhysicalDevices() to list physical devices. Select one (or more) based on
VkPhysicalDevicePropertiesandVkPhysicalDeviceFeatures. - Find a queue family on the physical device. It should handle graphic, compute, and transfer jobs as well as be able to present the final image.
- Create a logical device. Enable device extensions and selected features.
- Get a queue from the logical device. Used to submit commands.
Vulkan device extensions
Here are a few of Vulkan device extensions that you might consider using:
- VK_KHR_swapchain. Companion to
VK_KHR_surface. Adds the ability to present the result to a window. - VK_KHR_synchronization2. Simplifies synchronization API. We will look at it closely in “Vulkan synchronization”.
- VK_KHR_push_descriptor. Simplifies managing uniforms. Uniforms are used to provide data (buffers, images, etc.) to shaders.
- VK_KHR_dynamic_rendering. Simplifies rendering by removing subpasses and
VkFramebuffers. See Lesley Lai’s “VK_KHR_dynamic_rendering tutorial” if this piqued your interest. If you follow the guidelines in my “A typical Vulkan frame” article, the conversion is trivial. - VK_KHR_separate_depth_stencil_layouts. Used to read only depth from combined depth/stencil image.
- VK_KHR_shader_non_semantic_info. You might have already seen this extension in my other article “Debugging Vulkan using RenderDoc”.
In VkApplicationInfo you decided on the Vulkan version. It may already contain some of the extensions you will use. It’s not necessary to redeclare them. Validation layers will inform you if this happens.
If you are wondering what other device extensions exist, you can check Embark Studios’s kajiya.
Creating swapchain
By now we have selected the Vulkan version, picked the GPU device, and created a queue to submit commands to. In the next step, we will acquire a special image. Whatever we write to this image, will be shown (presented) to the user. These images are known as a swapchain. Usually, there are at least 2 images. One is presented to the user, while the application writes to the second one. Later, the images are swapped (double buffering).
Swapchain color space and format
The first step is to select VkFormat(e.g. VK_FORMAT_B8G8R8A8_UNORM) and color space(e.g. VK_COLOR_SPACE_SRGB_NONLINEAR_KHR). Use vkGetPhysicalDeviceSurfaceFormatsKHR() to list available VkSurfaceFormatKHR for our VkPhysicalDevice and VkSurfaceKHR.
The most common choices are the mentioned above-mentioned VK_FORMAT_B8G8R8A8_UNORM and VK_COLOR_SPACE_SRGB_NONLINEAR_KHR. Vulkan guarantees that VK_COLOR_SPACE_SRGB_NONLINEAR_KHR is available. Depending on your monitor, you might also receive HDR-ready VkSurfaceFormatKHR. This could be e.g. { format: R16G16B16A16_SFLOAT, color_space: EXTENDED_SRGB_LINEAR_EXT } or { format: A2B10G10R10_UNORM_PACK32, color_space: HDR10_ST2084_EXT }. I have 2 monitors and only one supports HDR. Depending on the position of the window, I get different results.
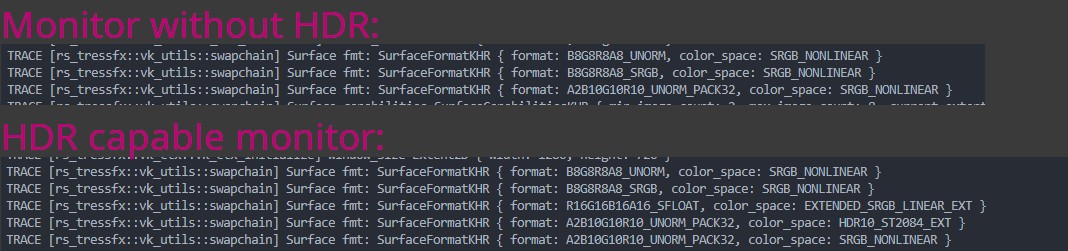
Logs of SurfaceFormatKHRs between 2 monitors. Monitor that does not support HDR has 3 available surface formats. Monitor with HDR has 5 surface formats. This includes e.g. VK_FORMAT_R16G16B16A16_SFLOAT image format or VK_COLOR_SPACE_HDR10_ST2084_EXT color space.
Supporting HDR is not as simple as changing the format/color space. E.g. part of your graphic pipeline may be HDR->LDR conversion, which is not needed for HDR display. You might also be using LUTs for color grading. This is fine for LDR, but you would never do this with HDR (special functions are a better alternative). Having 256x256x256 LUT was fine, but HDRs have a higher range of values. And even when presenting on LDR screens you should do the color grading before the conversion to LDR. Alex Fry’s “High Dynamic Range Color Grading and Display in Frostbite” presentation is a great introduction.
Color space decides how the display engine will interpret the values in the swapchain images. All lighting computations are done in linear space (unless you forgot to use *_SRGB format with your diffuse textures!). The swapchain with VK_COLOR_SPACE_SRGB_NONLINEAR_KHR color space interprets the values as if they were SRGB. For LDR displays there are 2 solutions:
- Use
VK_FORMAT_B8G8R8A8_UNORMformat. Before writing to the swapchain image do gamma correction. Simplepow(color, 1.0 / gammaValue)is enough.gammaValueis usually 2.2. - Use
VK_FORMAT_B8G8R8A8_SRGB. In the shader, write linear-space values. Then, the swapchain automatically applies the gamma correction.
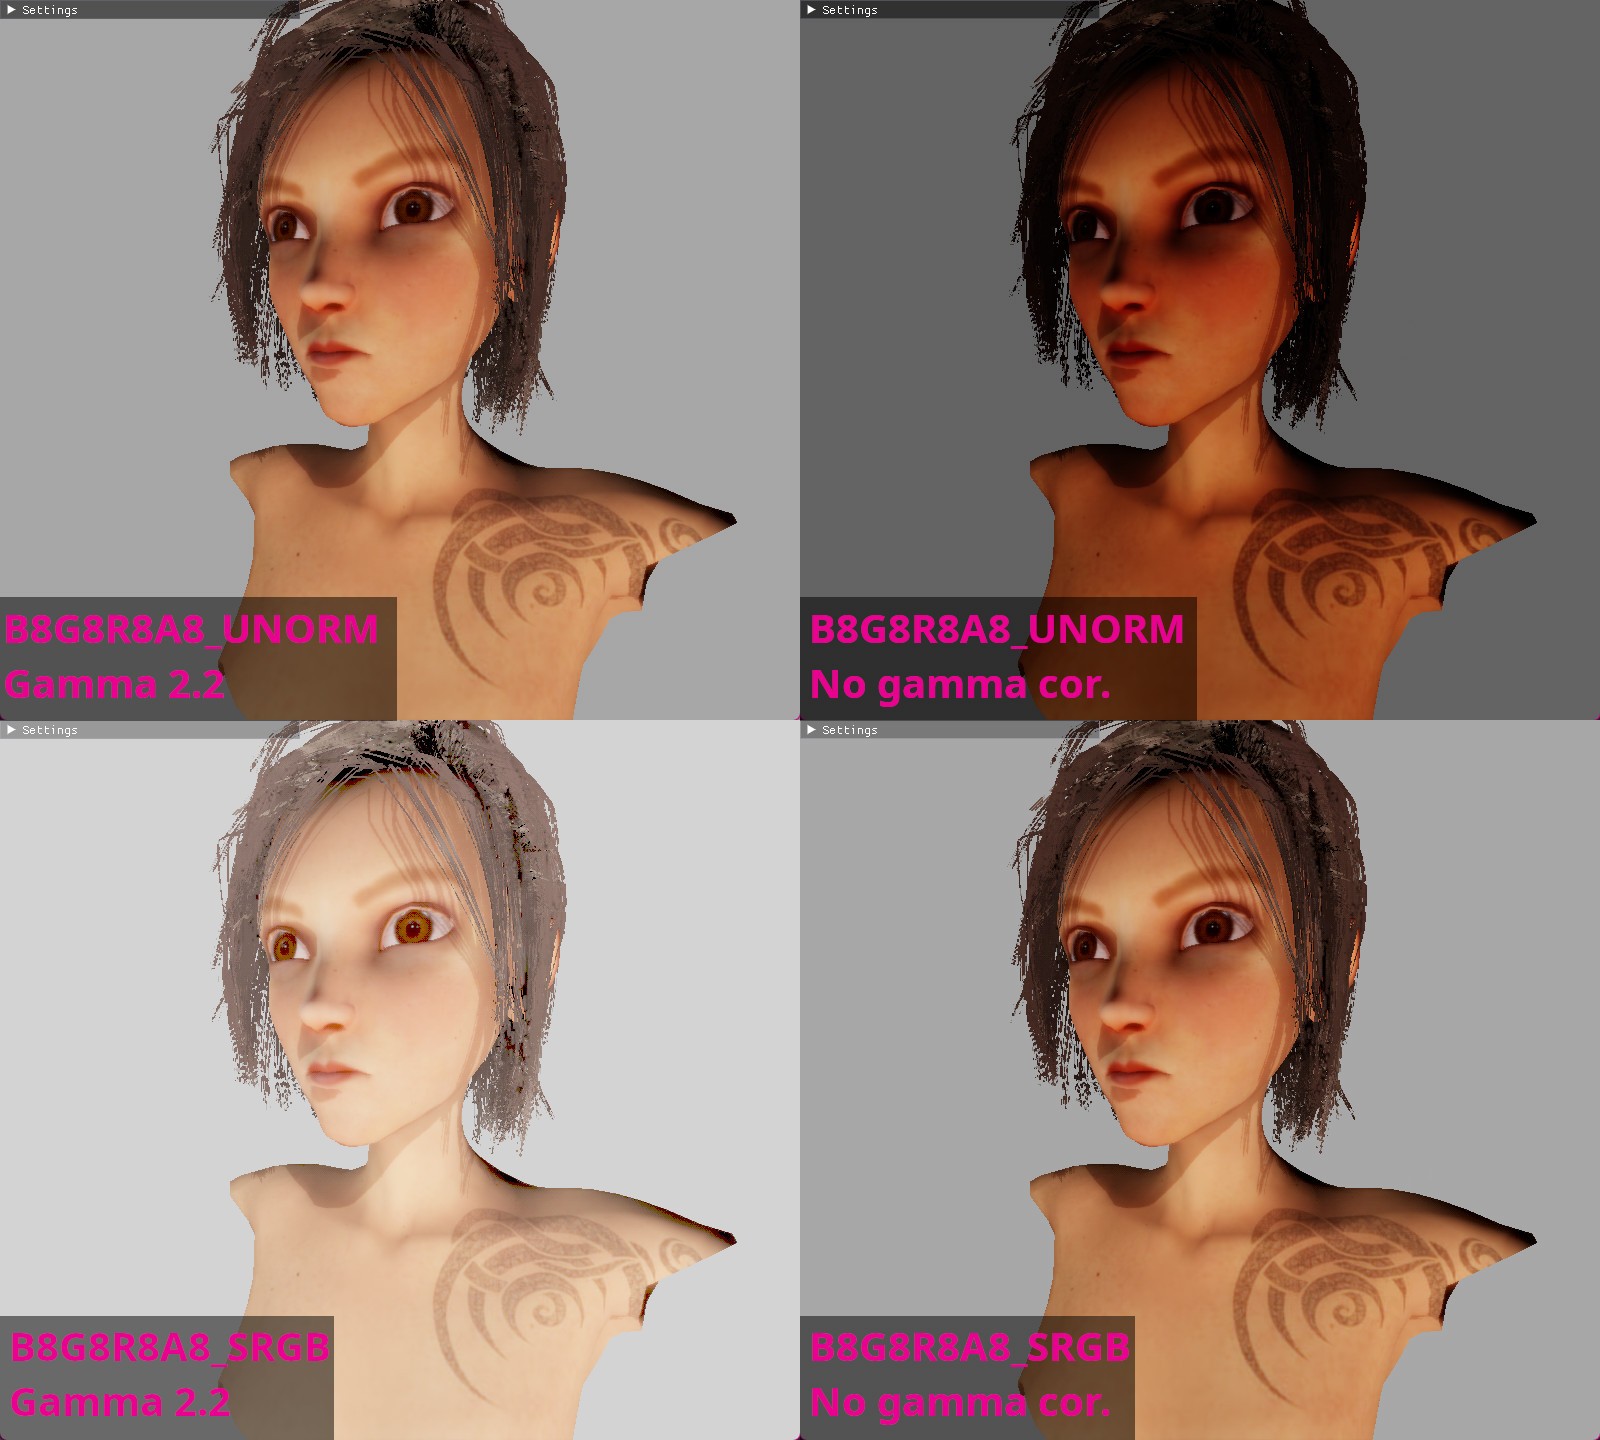
Images for VK_FORMAT_B8G8R8A8_UNORM with gamma 2.2 and VK_FORMAT_B8G8R8A8_SRGB without gamma correction are similar. *_SRGB format automatically applies gamma correction. The image with VK_FORMAT_B8G8R8A8_SRGB and gamma correction is bright. The gamma correction is applied twice. The image for VK_FORMAT_B8G8R8A8_UNORM without gamma correction is dark. It shows raw linear-space values.
You can read about the difference between sRGB and gamma 2.2 in Tom Forsyth’s “The sRGB Learning Curve”.
Remember to load the scene object’s textures into images with the correct image formats. Diffuse textures from Photoshop usually already have gamma conversion applied. You should load them into
*_SRGBtextures. Please verify this with the artists! Normal and specular textures are always raw linear data. Unless someone made a mistake - verify!
VkPresentModeKHR and enabling VSync
Every monitor has an innate refresh rate, usually 60Hz or 144Hz. It (in crude terms) indicates how many frames it can display per second. Yet your app is not limited by this. You can render at e.g. 1000 frames/second. At some point, you will queue the image for presentation. But what if the display is in the middle of updating with an older image? There are 2 most obvious solutions. Presenting continues with a new image, which leads to tearing. Or it continues with an older image, temporarily ignoring the newest one.
In Vulkan, you can query which VkPresentModeKHR are available. The result depends on the chosen VkPhysicalDevice and VkSurfaceKHR. Usually, you end up with something like this:
pub unsafe fn get_present_mode(surface_loader: &Surface,surface_khr: vk::SurfaceKHR,phys_device: vk::PhysicalDevice,vsync: bool,) -> vk::PresentModeKHR {let present_modes = surface_loader.get_physical_device_surface_present_modes(phys_device, surface_khr).expect("Failed to get surface present modes");// preferences based on if we want vsynclet present_mode_preference = if vsync {vec![vk::PresentModeKHR::FIFO_RELAXED, vk::PresentModeKHR::FIFO]} else {vec![vk::PresentModeKHR::MAILBOX, vk::PresentModeKHR::IMMEDIATE]};present_mode_preference.into_iter().find(|mode| present_modes.contains(mode)).unwrap_or(vk::PresentModeKHR::FIFO) // FIFO is guaranteed}
Documentation for VkPresentModeKHR is surprisingly easy to read. I also recommend Johannes Unterguggenberger’s “Presentation Modes and Swap Chain Setup in Vulkan”. VK_PRESENT_MODE_FIFO_KHR is always available and makes a good default.
Remember
VkPresentModeKHRas it will be important when we discuss frames in flight.
Yet this is not enough to enable/disable VSync. Imagine some old-school WinForms app. It rerenders the content only after user interaction. Of course, in video games, we do not want this (though it could be useful in e.g. main menu when nothing dynamic happens). I have used the winit Rust library and this behavior is described in the event handling section.
let event_loop = EventLoop::new();event_loop.run(move |event, _, control_flow| {/// wait for user interaction before before redrawing// *control_flow = ControlFlow::Wait;/// run continuously, without waiting for any particular event*control_flow = ControlFlow::Poll;... // handle event e.g. key press or redraw requestif close_requested { // e.g. user pressed `ESC` key*control_flow = ControlFlow::Exit; // end the event loop}});
Adding alpha channel
The window shown to the user does not have to be a rectangle. If we add an alpha channel, we can create many interesting effects.
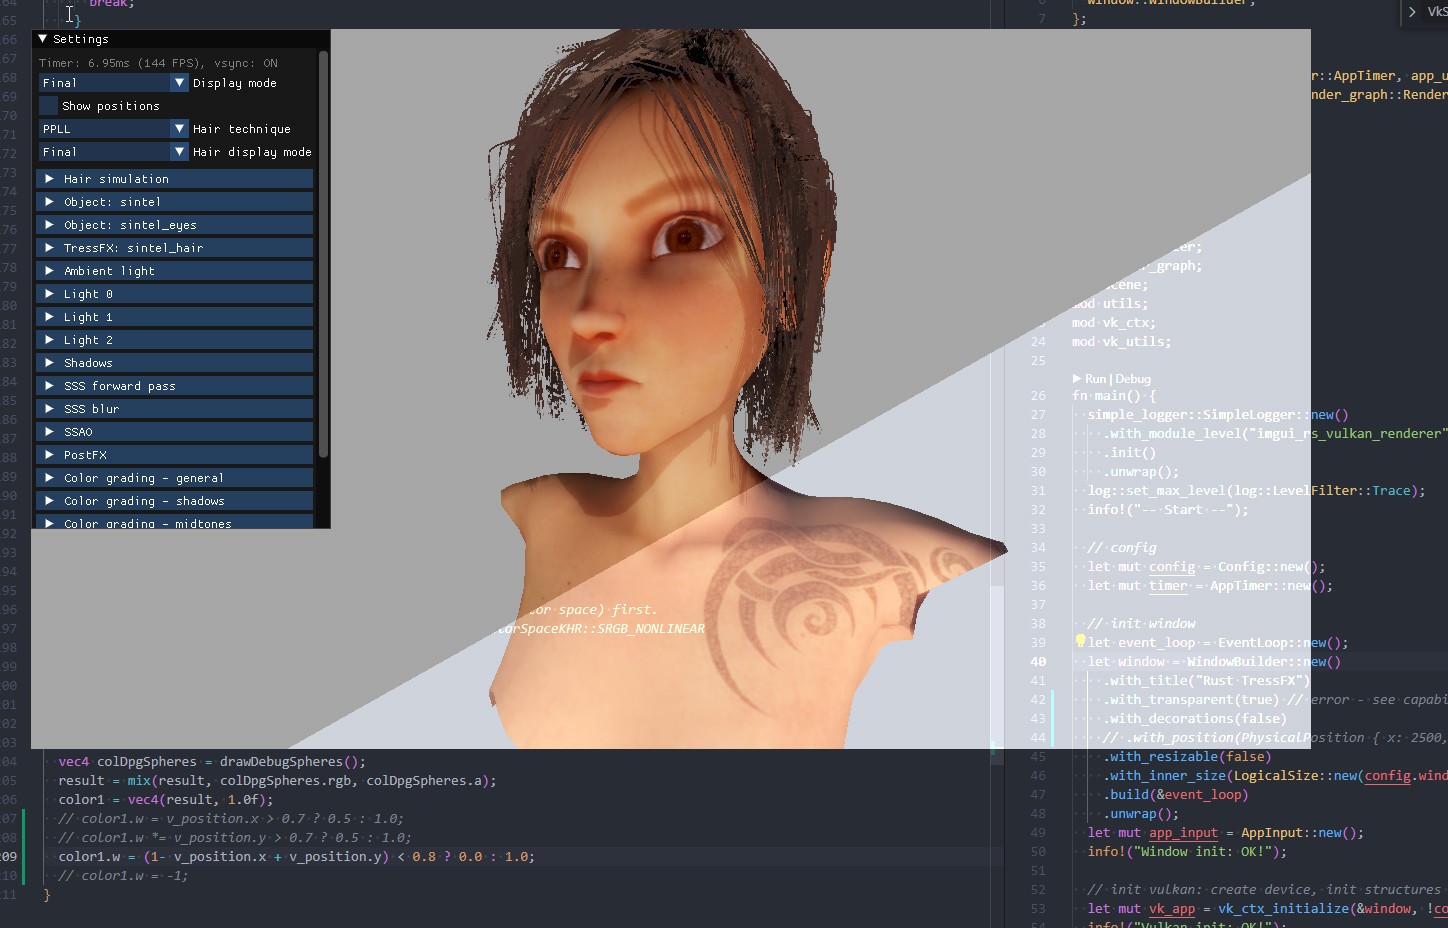
The transparency is controlled by the GLSL shader. For an even cooler effect, you could sample it from an image.
First, we need to check if this feature is supported using vkGetPhysicalDeviceSurfaceCapabilitiesKHR(). If the VkSurfaceCapabilitiesKHR.supportedCompositeAlpha mask field contains only the VK_COMPOSITE_ALPHA_OPAQUE_BIT_KHR, we are out of luck.
If this feature is supported, you also need to:
- During initialization, create a swapchain with
compositeAlpha=VK_COMPOSITE_ALPHA_POST_MULTIPLIED_BIT_KHR. - During initialization, enable transparency for your window. In winit, set
.with_transparent(true). You can add.with_decorations(false)to remove menu bars. - Before each draw, clear the swapchain image to
(0,0,0,0). - In fragment shader, set pixel alpha when rendering to swapchain image e.g.
color1.w = 0.5;.
Unfortunately, this feature does not always work on all hardware/drivers/OSes. On NVIDIA 1050 Ti, driver version 531.41 and Windows 10, VK_COMPOSITE_ALPHA_POST_MULTIPLIED_BIT_KHR is not even needed. I’ve seen many users report issues with this functionality. Though there might always be something that I have missed.
Creating swapchain
We are ready to create the VkSwapchainKHR object. All we have to do is to provide VkSwapchainCreateInfoKHR to vkCreateSwapchainKHR(). Available fields:
VkSwapchainCreateFlagsKHR flags. Usually0, nothing interesting here.VkSurfaceKHR surface. TheVkSurfaceKHRthat we already have.VkFormat imageFormat. TheVkFormatthat we have selected.VkColorSpaceKHR imageColorSpace. TheVkColorSpaceKHRthat we have selected.VkExtent2D imageExtent. The 2D size of the image. Should be the same as your OS window.uint32_t imageArrayLayers. Usually1, unless you are writing a VR app that needs separate images for the left and right eye.VkImageUsageFlags imageUsage. UsuallyVK_IMAGE_USAGE_COLOR_ATTACHMENT_BITif you render to swapchain images using shaders orVK_IMAGE_USAGE_TRANSFER_DST_BITif you copy the pixels from another existing image. This field is a mask so you can set both using logical OR operation. This use case happens when you want to overlay debug images on top of the finished frame.VkSharingMode imageSharingMode. UsuallyVK_SHARING_MODE_EXCLUSIVEunless you need to use the image on multiple queue families.uint32_t* pQueueFamilyIndices. We selected a queue family after calling vkGetPhysicalDeviceQueueFamilyProperties(). You can also ignore this setting due toVK_SHARING_MODE_EXCLUSIVEsharing mode.VkSurfaceTransformFlagBitsKHR preTransform. Rotate/mirror image before displaying. I recommendVK_SURFACE_TRANSFORM_IDENTITY_BIT_KHR. However, you should checkVkSurfaceCapabilitiesKHR.supportedTransformsand useVkSurfaceCapabilitiesKHR.currentTransformas a fallback.VkCompositeAlphaFlagBitsKHR compositeAlpha. We have already discussed alpha compositing. It’s usuallyVK_COMPOSITE_ALPHA_OPAQUE_BIT_KHR.VkPresentModeKHR presentMode. TheVkPresentModeKHRthat we have selected.VkBool32 clipped. The official specification-recommended value isVK_TRUE. It allows skipping the fragment shader for pixels covered by another window.VkSwapchainKHR oldSwapchain. PreviousVkSwapchainKHRorVK_NULL_HANDLE. Remember that swapchain is associated withVkSurfaceKHRand has width/height. So you might have to recreate the swapchain after the user changes window size or resolution. vkAcquireNextImageKHR() should return error codeVK_ERROR_OUT_OF_DATE_KHRif that happens.
Careful readers might notice that I have missed uint32_t minImageCount. This setting dictates how many images will be created in a swapchain. Use 2 for double buffering and 3 for triple buffering. Arm’s Choosing the right number of swap chain images explains the difference. Your choice may depend on the chosen VkPresentModeKHR.
If the user minimizes the app, it may cause a resize of the window to one with 0 width and height. This may cause VK_ERROR_OUT_OF_DATE_KHR as if the user changed the window resolution (it does not do this on my PC). To solve this, you can e.g. skip rendering when the window is minimized. After the window is visible again, there is no guarantee that the old swapchain is still usable. Everything depends on the value returned from the next vkAcquireNextImageKHR(). This is something that you should handle gracefully. I assume that the exact behavior is OS-dependent.
After we have created the swapchain, we will retrieve the swapchain images to render to.
Creating swapchain images
To get a VkImage for each created swapchain image call vkGetSwapchainImagesKHR(). In C++ you might want to first query the number of images by setting pSwapchainImages to NULL.
In Vulkan, you rarely operate on a raw VkImage. Image views are used instead. For example, an image with a format that supports depth/stencil can have 3 image views. One is used as a render target (aspect is VK_IMAGE_ASPECT_DEPTH_BIT | VK_IMAGE_ASPECT_STENCIL_BIT). Second, to sample depth buffer value from shader (VK_IMAGE_ASPECT_DEPTH_BIT). Last could be used to sample only stencil (VK_IMAGE_ASPECT_STENCIL_BIT). Another example is a collection of 6 images (or, more precisely, 1 VkImage with 6 layers). We can create from it an image view with the type VK_IMAGE_VIEW_TYPE_CUBE (a cubemap).
There is not much you can configure here:
let swapchain_image_views: Vec<vk::ImageView> = swapchain_images.iter().map(|&swapchain_image| {let subresource_range = vk::ImageSubresourceRange::builder().aspect_mask(vk::ImageAspectFlags::COLOR).base_array_layer(0).layer_count(1).base_mip_level(0) // base mipmap level.level_count(1) // mipmap levels.build();let create_info = vk::ImageViewCreateInfo::builder().image(swapchain_image).view_type(vk::ImageViewType::TYPE_2D).format(swapchain_image_format).subresource_range(subresource_range).build();device.create_image_view(&create_info, None).expect("Failed creating image view")}).collect();
In C++ you call vkCreateImageView(). I do not have much experience with VR, but I think that’s the only case for layer_count other than 1. You have separate image views for the left and right eye. There is no need for mipmaps other than the base level. The only parameter that is not contained in this snippet is swapchain_image_format. It’s the format that we selected after calling vkGetPhysicalDeviceSurfaceFormatsKHR() e.g. VK_FORMAT_B8G8R8A8_UNORM.
The number of created swapchain images is not related to
frames in flight. This is discussed in “Vulkan synchronization”.
Other miscellaneous Vulkan objects
Most of the Vulkan initialization is behind us. The objects that are left - while important - are quite simple to use. We will explore AMD’s Vulkan Memory Allocator in a separate article about Vulkan resources.
Storing Vulkan commands
To execute an operation in Vulkan, you record commands to the GPU into a command buffer. Then you submit the commands to the queue using vkQueueSubmit(). Examples of commands include:
- vkCmdDraw(). Draw triangles.
- vkCmdDispatch(). Dispatch compute shader.
- vkCmdBindVertexBuffers(), vkCmdBindIndexBuffer(). Bind vertex/index buffers before a draw.
- vkCmdCopyBuffer(), vkCmdCopyImage(). Copy data between buffers/images.
- vkCmdWriteTimestamp(). Used by GPU profilers.
The first argument is always the command buffer to which the command is recorded. This is a core concept of Vulkan. Recording commands consumes most of the CPU time when drawing the frame.
Before allocating VkCommandBuffer you need to create VkCommandPool first. VkCommandPoolCreateInfo has only 2 fields. First is queueFamilyIndex which we have selected from the physical device. We have already seen this index in a few other places. The second field is flags related to how we are going to use the command buffers from this pool. They are a bit more complicated.
VK_COMMAND_POOL_CREATE_RESET_COMMAND_BUFFER_BIT allows resetting the command buffer. If you are going to reuse command buffers, it’s a good idea to clear their content before doing so. This is done by calling vkResetCommandBuffer() or vkBeginCommandBuffer(). The second function is more popular. It also puts the command buffer in a recording state.
VK_COMMAND_POOL_CREATE_TRANSIENT_BIT is for short-lived command buffers. It’s mostly an optimization. You can skip it anyway.
I’ve seen some code that tries to reset the command pool right after creation, but this should not be necessary.
To create a command buffer call vkAllocateCommandBuffers(). Besides the command pool object, it contains only level and commandBufferCount fields. VK_COMMAND_BUFFER_LEVEL_PRIMARY can be submitted to the queue. VK_COMMAND_BUFFER_LEVEL_SECONDARY can be ‘included’ in other command buffers to reuse commands. Usually, you will only create command buffers of VK_COMMAND_BUFFER_LEVEL_PRIMARY level. commandBufferCount describes how many command buffers to create.
The simplest usage of command buffers is one for each frame in flight. At the start of the frame we call vkBeginCommandBuffer(). We record some commands. Then we call vkEndCommandBuffer() and submit the work to GPU with vkQueueSubmit(). Of course, this can get more complicated. If you have many threads recording command buffers for a single frame, you usually have one command pool per thread.
We will explore
frames in flightin depth in “Vulkan synchronization”. Reading it will allow you to make more conscious decisions regardingcommand buffers.
Let’s look at sample Vulkan projects:
- Embark Studios’s kajiya creates a separate pool per each command buffer. Each frame has a
main_command_bufferandpresentation_command_buffer. They are reset at the start ofdraw_frame(). A few lines below, it records and submits the main command buffer. Then, it records and submits the presentation command buffer. - Arseny Kapoulkine’s niagara creates only a single command buffer. It is reset, commands are recorded, and then the recording stops. Afterwards, Niagara waits for all GPU work to be finished (vkDeviceWaitIdle()). This ensures that profiling timestamps are available before calling
vkGetQueryPoolResults().
Alternatively, you can record the command buffers only once (during the app initialization). Every app parameter is then controlled by uniforms. While not all apps fit this approach, it could be an interesting optimization.
A common pattern in Vulkan is to create a special setup command buffer. When uploading data for 3D objects, we might not be able to write to high-performance GPU memory regions directly from the CPU. To solve this, we write the data to temporary, CPU-visible memory and use the setup command buffer to copy it to the more optimal chunk of memory. We will see this pattern over and over again in the “Vulkan resources” article.
While command buffers are easy to create there is a bit of theory behind using them efficiently. Be it to set up synchronization, optimize resource’s memory placement, or draw scene triangles. Commands are how you order a GPU to do something.
Pipeline cache
In Vulkan, VkPipeline adds context to commands that use shaders. We will explore this concept in more detail in “A typical Vulkan frame”. For now, I will just give a generic overview. To create a VkPipeline, one does need a VkShaderModule.
- The pipeline for compute shaders consists mostly of
VkPipelineShaderStageCreateInfo(derived fromVkShaderModule) and the description of uniform bindings. - The graphic pipeline uses the most complex Vulkan object - VkGraphicsPipelineCreateInfo. Besides shader and uniform data, it describes vertex format, viewport size, depth/stencil/blending operations, front face culling, and many, many more.
- There is also a separate vkCreateRayTracingPipelinesKHR() to create a ray-tracing pipeline.
Pipeline cache is required to create a new VkPipeline. As the name suggests, it tries to optimize the creation of new pipelines. Use vkGetPipelineCacheData() to get cache content and save it on the hard drive. Call vkCreatePipelineCache() to create a new cache. VkPipelineCacheCreateInfo.pInitialData is a void* pointer to the data retrieved from the hard drive. What is the content of the cache? It’s driver-dependent. You can read Arseny Kapoulkine’s “Robust pipeline cache serialization” for more details. It mentions e.g. how to discard the previous cache if the user has changed GPU or installed a new driver.
Summary
In this article, we have seen how to initialize Vulkan. We’ve chosen the API version, added instance and device extensions. We went over Vulkan integration with an OS-provided window. We have listed available GPUs and selected ones that match our preferences. We created a queue to which we will submit commands. Swapchain images are ready for rendering. We have seen how to create command buffers. The pipeline cache is ready for compute and graphic passes. But before we progress further, we need to understand Vulkan synchronization.
References
- https://vulkan-tutorial.com/
- Arseny Kapoulkine’s “niagara: Building a Vulkan renderer from scratch*” playlist
- Arseny Kapoulkine’s “Writing an efficient Vulkan renderer”
- https://stackoverflow.com/questions/55272626/what-is-actually-a-queue-family-in-vulkan
- Alex Fry’s “High Dynamic Range Color Grading and Display in Frostbite”
- Tom Forsyth’s “The sRGB Learning Curve”
- Johannes Unterguggenberger’s “Presentation Modes and Swap Chain Setup in Vulkan”
- Embark Studios’s kajiya
- Arseny Kapoulkine’s niagara